vue-analysis

# 一、响应式原理
Vue.js 是一款 MVVM 框架,通过响应式在修改数据的时候更新视图。
Vue.js 的响应式原理依赖于Object.defineProperty,这也是Vue 不支持 IE8 以及更低版本浏览器的原因。
Vue 通过设定对象属性的 setter/getter 方法来监听数据的变化,通过 getter 进行依赖收集,而每个 setter 方法就是一个观察者,在数据变更的时候通知订阅者更新视图。
# 将数据 data 变成可观察的
// 属性代理
function _proxy(data) {
  const that = this;
  Object.keys(data).forEach(key => {
    Object.defineProperty(that, key, {
      configurable: true /* 属性可被修改或删除 */,
      enumerable: true /* 属性可枚举 */,
      get: function proxyGetter() {
        return that._data[key];
      },
      set: function proxySetter(val) {
        that._data[key] = val;
      }
    });
  });
}

function observe(value, cb) {
  Object.keys(value).forEach(key => defineReactive(value, key, value[key], cb));
}

function defineReactive(obj, key, val, cb) {
  Object.defineProperty(obj, key, {
    enumerable: true,
    configurable: true,
    get: () => {
      /*....依赖收集等....*/
      return val;
    },
    set: newVal => {
      val = newVal;
      cb(); /*订阅者收到消息的回调*/
    }
  });
}

class Vue {
  constructor(options) {
    this._data = options.data;
    observe(this._data, options.render);
    _proxy.call(this, options.data); // 执行代理
  }
}

let app = new Vue({
  el: "#app",
  data: {
    text: "text",
    text2: "text2"
  },
  render() {
    console.log("render");
  }
});

app.text = 111; // render
2
3
4
5
6
7
8
9
10
11
12
13
14
15
16
17
18
19
20
21
22
23
24
25
26
27
28
29
30
31
32
33
34
35
36
37
38
39
40
41
42
43
44
45
46
47
48
49
50
51
52
53
54
55
56
为了便于理解,先不考虑数组等情况,代码如上所示。在initData中会调用observe这个函数将 Vue 的数据设置成 observable 的。当_data 数据发生改变的时候就会触发 set,对订阅者进行回调(在这里是 render)
每次对 app._data.text 操作才会触发 set。为了偷懒,我们可以在 Vue 的构造函数 constructor 中为 data 执行一个代理proxy。这样我们就把 data 上面的属性代理到了 vm 实例上。最终通过 app.text 直接设置就能触发 set 对视图进行重绘
# 二、依赖收集
# 为什么要进行依赖收集?先看 👇
new Vue({
  template: `<div>
            <span>text1:</span> {{text1}}
            <span>text2:</span> {{text2}}
        <div>`,
  data: {
    text1: "text1",
    text2: "text2",
    text3: "text3"
  }
});
2
3
4
5
6
7
8
9
10
11
照上节响应式原理所讲会出现一个问题,text3 在实际模板中并没有被用到,然而当 text3 的数据被修改(this.text3 = 'test')的时候,同样会触发 text3 的 setter 导致重新执行渲染,这显然不正确。
# 解决方法
在最开始进行一次 render,因为当 render function 被渲染的时候,会读取所需对象的值,所以会触发 getter 函数,那么所有被渲染所依赖的 data 中的数据就会被 getter 收集到 Dep 的 subs 中去。在对 data 中的数据进行修改的时候 setter 只会触发 Dep 的 subs 的函数。
function _proxy(data) {
  const that = this;
  Object.keys(data).forEach(key => {
    Object.defineProperty(that, key, {
      configurable: true /* 属性可被修改或删除 */,
      enumerable: true /* 属性可枚举 */,
      get: function proxyGetter() {
        return that._data[key];
      },
      set: function proxySetter(val) {
        that._data[key] = val;
      }
    });
  });
}

// 定义一个依赖收集类Dep
class Dep {
  constructor() {
    /* 用来存放 Watcher 对象的数组 */
    this.subs = [];
  }
  /* 在 subs 中添加一个 Watcher 对象 */
  addSub(sub) {
    this.subs.push(sub);
  }
  /* 通知所有 Watcher 对象更新视图 */
  notify() {
    this.subs.forEach(sub => {
      sub.update();
    });
  }
}

class Watcher {
  constructor(cb) {
    this.cb = cb;
    /* 在 new 一个 Watcher 对象时将该对象赋值给 Dep.target,在 get 中会用到 */
    Dep.target = this;
  }
  /* 更新视图的方法 */
  update() {
    this.cb();
  }
}

Dep.target = null;

function observe(value) {
  Object.keys(value).forEach(key => defineReactive(value, key, value[key]));
}

function defineReactive(obj, key, val) {
  /*在闭包内存储一个Dep对象*/
  const dep = new Dep();
  Object.defineProperty(obj, key, {
    enumerable: true,
    configurable: true,
    get: function reactiveGetter() {
      /* 将 Dep.target(即当前的 Watcher 对象存入 dep 的 subs 中) */
      dep.addSub(Dep.target);
      return val;
    },
    set: function reactiveSetter(newVal) {
      /* 在 set 的时候触发 dep 的 notify 来通知所有的 Watcher 对象更新视图 */
      dep.notify();
    }
  });
}

class Vue {
  constructor(options) {
    _proxy.call(this, options.data);
    this._data = options.data;
    observe(this._data);
    /* 新建一个 Watcher 观察者对象,这时候 Dep.target 会指向这个 Watcher 对象 */
    new Watcher(options.render);
    /* 在这里模拟 render 的过程,为了触发 test 属性的 get 函数 */
    console.log("模拟render~", this.text1, this.text2);
  }
}

let app = new Vue({
  template: `<div>
            <span>text1:</span> {{text1}}
            <span>text2:</span> {{text2}}
        <div>`,
  data: {
    text1: "text1",
    text2: "text2",
    text3: "text3"
  },
  render() {
    console.log("render");
  }
});

app.text1 = 111; // render
app.text2 = 111; // render
app.text3 = 111; //
2
3
4
5
6
7
8
9
10
11
12
13
14
15
16
17
18
19
20
21
22
23
24
25
26
27
28
29
30
31
32
33
34
35
36
37
38
39
40
41
42
43
44
45
46
47
48
49
50
51
52
53
54
55
56
57
58
59
60
61
62
63
64
65
66
67
68
69
70
71
72
73
74
75
76
77
78
79
80
81
82
83
84
85
86
87
88
89
90
91
92
93
94
95
96
97
98
99
100
Vue 在初始化的时候利用 Object.defineProperty,给每个 data 的值增加 get/set 方法,在 get 的时候进行依赖收集,在 set 的时候通知订阅者更新视图,从而实现对数据的响应式化
# 三、从源码角度再看数据绑定
# 数据绑定原理
前面已经讲过 Vue 数据绑定的原理了,现在从源码来看一下数据绑定在 Vue 中是如何实现的。
首先看一下 Vue.js 官网介绍响应式原理的这张图。

这张图比较清晰地展示了整个流程,首先通过一次渲染操作触发 Data 的 getter(这里保证只有视图中需要被用到的 data 才会触发 getter)进行依赖收集,这时候其实 Watcher 与 data 可以看成一种被绑定的状态(实际上是 data 的闭包中有一个 Deps 订阅者,在修改的时候会通知所有的 Watcher 观察者),在 data 发生变化的时候会触发它的 setter,setter 通知 Watcher,Watcher 进行回调通知组件重新渲染的函数,之后根据 diff 算法来决定是否发生视图的更新。
Vue 在初始化组件数据时,在生命周期的beforeCreate与created钩子函数之间实现了对data、props、computed、methods、events 以及 watch的处理。
# initData
这里来讲一下initData,可以参考源码 instance 下的 state.js 文件,initData 主要是初始化 data 中的数据,将数据进行 Observer,监听数据的变化,其他的监视原理一致,这里以 data 为例。
function initData(vm: Component) {
  /*得到data数据*/
  let data = vm.$options.data;
  data = vm._data = typeof data === "function" ? getData(data, vm) : data || {};

  /*判断是否是对象*/
  if (!isPlainObject(data)) {
    data = {};
    process.env.NODE_ENV !== "production" &&
      warn(
        "data functions should return an object:\n" +
          "https://vuejs.org/v2/guide/components.html#data-Must-Be-a-Function",
        vm
      );
  }

  // proxy data on instance
  /*遍历data对象*/
  const keys = Object.keys(data);
  const props = vm.$options.props;
  let i = keys.length;

  //遍历data中的数据
  while (i--) {
    /*保证data中的key不与props中的key重复,props优先,如果有冲突会产生warning*/
    if (props && hasOwn(props, keys[i])) {
      process.env.NODE_ENV !== "production" &&
        warn(
          `The data property "${keys[i]}" is already declared as a prop. ` +
            `Use prop default value instead.`,
          vm
        );
    } else if (!isReserved(keys[i])) {
      /*判断是否是保留字段*/

      /*这里是我们前面讲过的代理,将data上面的属性代理到了vm实例上*/
      proxy(vm, `_data`, keys[i]);
    }
  }
  // observe data
  /*从这里开始我们要observe了,开始对数据进行绑定,这里有尤大大的注释asRootData,这步作为根数据,下面会进行递归observe进行对深层对象的绑定。*/
  observe(data, true /* asRootData */);
}
2
3
4
5
6
7
8
9
10
11
12
13
14
15
16
17
18
19
20
21
22
23
24
25
26
27
28
29
30
31
32
33
34
35
36
37
38
39
40
41
42
43
其实这段代码主要做了两件事,一是将_data 上面的数据代理到 vm 上,另一件事通过 observe 将所有数据变成 observable。
# proxy
接下来看一下 proxy 代理。
/*添加代理*/
export function proxy(target: Object, sourceKey: string, key: string) {
  sharedPropertyDefinition.get = function proxyGetter() {
    return this[sourceKey][key];
  };
  sharedPropertyDefinition.set = function proxySetter(val) {
    this[sourceKey][key] = val;
  };
  Object.defineProperty(target, key, sharedPropertyDefinition);
}
2
3
4
5
6
7
8
9
10
这里比较好理解,通过 proxy 函数将 data 上面的数据代理到 vm 上,这样就可以用 app.text 代替 app._data.text 了。
# observe
接下来是observe,这个函数定义在 core 文件下 observer 的 index.js 文件中。
/**
 * Attempt to create an observer instance for a value,
 * returns the new observer if successfully observed,
 * or the existing observer if the value already has one.
 */
/*
 尝试创建一个Observer实例(__ob__),如果成功创建Observer实例则返回新的Observer实例,如果已有Observer实例则返回现有的Observer实例。
 */
export function observe(value: any, asRootData: ?boolean): Observer | void {
  /*判断是否是一个对象*/
  if (!isObject(value)) {
    return;
  }
  let ob: Observer | void;

  /*这里用__ob__这个属性来判断是否已经有Observer实例,如果没有Observer实例则会新建一个Observer实例并赋值给__ob__这个属性,如果已有Observer实例则直接返回该Observer实例*/
  if (hasOwn(value, "__ob__") && value.__ob__ instanceof Observer) {
    ob = value.__ob__;
  } else if (
    /*这里的判断是为了确保value是单纯的对象,而不是函数或者是Regexp等情况。*/
    observerState.shouldConvert &&
    !isServerRendering() &&
    (Array.isArray(value) || isPlainObject(value)) &&
    Object.isExtensible(value) &&
    !value._isVue
  ) {
    ob = new Observer(value);
  }
  if (asRootData && ob) {
    /*如果是根数据则计数,后面Observer中的observe的asRootData非true*/
    ob.vmCount++;
  }
  return ob;
}
2
3
4
5
6
7
8
9
10
11
12
13
14
15
16
17
18
19
20
21
22
23
24
25
26
27
28
29
30
31
32
33
34
Vue 的响应式数据都会有一个ob的属性作为标记,里面存放了该属性的观察器,也就是 Observer 的实例,防止重复绑定。
# Observer
接下来看一下新建的Observer。Observer 的作用就是遍历对象的所有属性将其进行双向绑定。
/**
 * Observer class that are attached to each observed
 * object. Once attached, the observer converts target
 * object's property keys into getter/setters that
 * collect dependencies and dispatches updates.
 */
export class  {
  value: any;
  dep: Dep;
  vmCount: number; // number of vms that has this object as root $data

  constructor (value: any) {
    this.value = value
    this.dep = new Dep()
    this.vmCount = 0

    /*
    将Observer实例绑定到data的__ob__属性上面去,之前说过observe的时候会先检测是否已经有__ob__对象存放Observer实例了,def方法定义可以参考https://github.com/vuejs/vue/blob/dev/src/core/util/lang.js#L16
    */
    def(value, '__ob__', this)
    if (Array.isArray(value)) {

      /*
          如果是数组,将修改后可以截获响应的数组方法替换掉该数组的原型中的原生方法,达到监听数组数据变化响应的效果。
          这里如果当前浏览器支持__proto__属性,则直接覆盖当前数组对象原型上的原生数组方法,如果不支持该属性,则直接覆盖数组对象的原型。
      */
      const augment = hasProto
        ? protoAugment  /*直接覆盖原型的方法来修改目标对象*/
        : copyAugment   /*定义(覆盖)目标对象或数组的某一个方法*/
      augment(value, arrayMethods, arrayKeys)

      /*如果是数组则需要遍历数组的每一个成员进行observe*/
      this.observeArray(value)
    } else {

      /*如果是对象则直接walk进行绑定*/
      this.walk(value)
    }
  }

  /**
   * Walk through each property and convert them into
   * getter/setters. This method should only be called when
   * value type is Object.
   */
  walk (obj: Object) {
    const keys = Object.keys(obj)

    /*walk方法会遍历对象的每一个属性进行defineReactive绑定*/
    for (let i = 0; i < keys.length; i++) {
      defineReactive(obj, keys[i], obj[keys[i]])
    }
  }

  /**
   * Observe a list of Array items.
   */
  observeArray (items: Array<any>) {

    /*数组需要遍历每一个成员进行observe*/
    for (let i = 0, l = items.length; i < l; i++) {
      observe(items[i])
    }
  }
}
2
3
4
5
6
7
8
9
10
11
12
13
14
15
16
17
18
19
20
21
22
23
24
25
26
27
28
29
30
31
32
33
34
35
36
37
38
39
40
41
42
43
44
45
46
47
48
49
50
51
52
53
54
55
56
57
58
59
60
61
62
63
64
65
Observer 为数据加上响应式属性进行双向绑定。如果是对象则进行深度遍历,为每一个子对象都绑定上方法,如果是数组则为每一个成员都绑定上方法。
如果是修改一个数组的成员,该成员是一个对象,那只需要递归对数组的成员进行双向绑定即可。但这时候出现了一个问题:如果我们进行 pop、push 等操作的时候,push 进去的对象根本没有进行过双向绑定,更别说 pop 了,那么我们如何监听数组的这些变化呢? Vue.js 提供的方法是重写 push、pop、shift、unshift、splice、sort、reverse 这七个数组方法。修改数组原型方法的代码可以参考observer/array.js以及observer/index.js。
export class Observer {
  value: any;
  dep: Dep;
  vmCount: number; // number of vms that has this object as root $data

  constructor(value: any) {
    //.......

    if (Array.isArray(value)) {
      /*
          如果是数组,将修改后可以截获响应的数组方法替换掉该数组的原型中的原生方法,达到监听数组数据变化响应的效果。
          这里如果当前浏览器支持__proto__属性,则直接覆盖当前数组对象原型上的原生数组方法,如果不支持该属性,则直接覆盖数组对象的原型。
      */
      const augment = hasProto
        ? protoAugment /*直接覆盖原型的方法来修改目标对象*/
        : copyAugment; /*定义(覆盖)目标对象或数组的某一个方法*/
      augment(value, arrayMethods, arrayKeys);

      /*如果是数组则需要遍历数组的每一个成员进行observe*/
      this.observeArray(value);
    } else {
      /*如果是对象则直接walk进行绑定*/
      this.walk(value);
    }
  }
}

/**
 * Augment an target Object or Array by intercepting
 * the prototype chain using __proto__
 */
/*直接覆盖原型的方法来修改目标对象或数组*/
function protoAugment(target, src: Object) {
  /* eslint-disable no-proto */
  target.__proto__ = src;
  /* eslint-enable no-proto */
}

/**
 * Augment an target Object or Array by defining
 * hidden properties.
 */
/* istanbul ignore next */
/*定义(覆盖)目标对象或数组的某一个方法*/
function copyAugment(target: Object, src: Object, keys: Array<string>) {
  for (let i = 0, l = keys.length; i < l; i++) {
    const key = keys[i];
    def(target, key, src[key]);
  }
}
2
3
4
5
6
7
8
9
10
11
12
13
14
15
16
17
18
19
20
21
22
23
24
25
26
27
28
29
30
31
32
33
34
35
36
37
38
39
40
41
42
43
44
45
46
47
48
49
50
/*
 * not type checking this file because flow doesn't play well with
 * dynamically accessing methods on Array prototype
 */

import { def } from "../util/index";

/*取得原生数组的原型*/
const arrayProto = Array.prototype;
/*创建一个新的数组对象,修改该对象上的数组的七个方法,防止污染原生数组方法*/
export const arrayMethods = Object.create(arrayProto)
[
  /**
   * Intercept mutating methods and emit events
   */
  /*这里重写了数组的这些方法,在保证不污染原生数组原型的情况下重写数组的这些方法,截获数组的成员发生的变化,执行原生数组操作的同时dep通知关联的所有观察者进行响应式处理*/
  ("push", "pop", "shift", "unshift", "splice", "sort", "reverse")
].forEach(function(method) {
  // cache original method
  /*将数组的原生方法缓存起来,后面要调用*/
  const original = arrayProto[method];
  def(arrayMethods, method, function mutator() {
    // avoid leaking arguments:
    // http://jsperf.com/closure-with-arguments
    let i = arguments.length;
    const args = new Array(i);
    while (i--) {
      args[i] = arguments[i];
    }
    /*调用原生的数组方法*/
    const result = original.apply(this, args);

    /*数组新插入的元素需要重新进行observe才能响应式*/
    const ob = this.__ob__;
    let inserted;
    switch (method) {
      case "push":
        inserted = args;
        break;
      case "unshift":
        inserted = args;
        break;
      case "splice":
        inserted = args.slice(2);
        break;
    }
    if (inserted) ob.observeArray(inserted);

    // notify change
    /*dep通知所有注册的观察者进行响应式处理*/
    ob.dep.notify();
    return result;
  });
});
2
3
4
5
6
7
8
9
10
11
12
13
14
15
16
17
18
19
20
21
22
23
24
25
26
27
28
29
30
31
32
33
34
35
36
37
38
39
40
41
42
43
44
45
46
47
48
49
50
51
52
53
54
从数组的原型新建一个 Object.create(arrayProto)对象,通过修改此原型可以保证原生数组方法不被污染。如果当前浏览器支持proto这个属性的话就可以直接覆盖该属性则使数组对象具有了重写后的数组方法。如果没有该属性的浏览器,则必须通过遍历 def 所有需要重写的数组方法,这种方法效率较低,所以优先使用第一种。
在保证不污染不覆盖数组原生方法添加监听,主要做了两个操作,第一是通知所有注册的观察者进行响应式处理,第二是如果是添加成员的操作,需要对新成员进行 observe。
但是修改了数组的原生方法以后我们还是没法像原生数组一样直接通过数组的下标或者设置 length 来修改数组,可以通过Vue.set 以及 splice 方法。
# Watcher
Watcher是一个观察者对象。依赖收集以后 Watcher 对象会被保存在 Deps 中,数据变动的时候会由 Deps 通知 Watcher 实例,然后由 Watcher 实例回调 cb 进行视图的更新。
export default class Watcher {
  vm: Component;
  expression: string;
  cb: Function;
  id: number;
  deep: boolean;
  user: boolean;
  lazy: boolean;
  sync: boolean;
  dirty: boolean;
  active: boolean;
  deps: Array<Dep>;
  newDeps: Array<Dep>;
  depIds: ISet;
  newDepIds: ISet;
  getter: Function;
  value: any;

  constructor(
    vm: Component,
    expOrFn: string | Function,
    cb: Function,
    options?: Object
  ) {
    this.vm = vm;
    /*_watchers存放订阅者实例*/
    vm._watchers.push(this);
    // options
    if (options) {
      this.deep = !!options.deep;
      this.user = !!options.user;
      this.lazy = !!options.lazy;
      this.sync = !!options.sync;
    } else {
      this.deep = this.user = this.lazy = this.sync = false;
    }
    this.cb = cb;
    this.id = ++uid; // uid for batching
    this.active = true;
    this.dirty = this.lazy; // for lazy watchers
    this.deps = [];
    this.newDeps = [];
    this.depIds = new Set();
    this.newDepIds = new Set();
    this.expression =
      process.env.NODE_ENV !== "production" ? expOrFn.toString() : "";
    // parse expression for getter
    /*把表达式expOrFn解析成getter*/
    if (typeof expOrFn === "function") {
      this.getter = expOrFn;
    } else {
      this.getter = parsePath(expOrFn);
      if (!this.getter) {
        this.getter = function() {};
        process.env.NODE_ENV !== "production" &&
          warn(
            `Failed watching path: "${expOrFn}" ` +
              "Watcher only accepts simple dot-delimited paths. " +
              "For full control, use a function instead.",
            vm
          );
      }
    }
    this.value = this.lazy ? undefined : this.get();
  }

  /**
   * Evaluate the getter, and re-collect dependencies.
   */
  /*获得getter的值并且重新进行依赖收集*/
  get() {
    /*将自身watcher观察者实例设置给Dep.target,用以依赖收集。*/
    pushTarget(this);
    let value;
    const vm = this.vm;

    /*
      执行了getter操作,看似执行了渲染操作,其实是执行了依赖收集。
      在将Dep.target设置为自身观察者实例以后,执行getter操作。
      譬如说现在的的data中可能有a、b、c三个数据,getter渲染需要依赖a跟c,
      那么在执行getter的时候就会触发a跟c两个数据的getter函数,
      在getter函数中即可判断Dep.target是否存在然后完成依赖收集,
      将该观察者对象放入闭包中的Dep的subs中去。
    */
    if (this.user) {
      try {
        value = this.getter.call(vm, vm);
      } catch (e) {
        handleError(e, vm, `getter for watcher "${this.expression}"`);
      }
    } else {
      value = this.getter.call(vm, vm);
    }
    // "touch" every property so they are all tracked as
    // dependencies for deep watching
    /*如果存在deep,则触发每个深层对象的依赖,追踪其变化*/
    if (this.deep) {
      /*递归每一个对象或者数组,触发它们的getter,使得对象或数组的每一个成员都被依赖收集,形成一个“深(deep)”依赖关系*/
      traverse(value);
    }

    /*将观察者实例从target栈中取出并设置给Dep.target*/
    popTarget();
    this.cleanupDeps();
    return value;
  }

  /**
   * Add a dependency to this directive.
   */
  /*添加一个依赖关系到Deps集合中*/
  addDep(dep: Dep) {
    const id = dep.id;
    if (!this.newDepIds.has(id)) {
      this.newDepIds.add(id);
      this.newDeps.push(dep);
      if (!this.depIds.has(id)) {
        dep.addSub(this);
      }
    }
  }

  /**
   * Clean up for dependency collection.
   */
  /*清理依赖收集*/
  cleanupDeps() {
    /*移除所有观察者对象*/
    let i = this.deps.length;
    while (i--) {
      const dep = this.deps[i];
      if (!this.newDepIds.has(dep.id)) {
        dep.removeSub(this);
      }
    }
    let tmp = this.depIds;
    this.depIds = this.newDepIds;
    this.newDepIds = tmp;
    this.newDepIds.clear();
    tmp = this.deps;
    this.deps = this.newDeps;
    this.newDeps = tmp;
    this.newDeps.length = 0;
  }

  /**
   * Subscriber interface.
   * Will be called when a dependency changes.
   */
  /*
      调度者接口,当依赖发生改变的时候进行回调。
   */
  update() {
    /* istanbul ignore else */
    if (this.lazy) {
      this.dirty = true;
    } else if (this.sync) {
      /*同步则执行run直接渲染视图*/
      this.run();
    } else {
      /*异步推送到观察者队列中,由调度者调用。*/
      queueWatcher(this);
    }
  }

  /**
   * Scheduler job interface.
   * Will be called by the scheduler.
   */
  /*
      调度者工作接口,将被调度者回调。
    */
  run() {
    if (this.active) {
      const value = this.get();
      if (
        value !== this.value ||
        // Deep watchers and watchers on Object/Arrays should fire even
        // when the value is the same, because the value may
        // have mutated.
        /*
            即便值相同,拥有Deep属性的观察者以及在对象/数组上的观察者应该被触发更新,因为它们的值可能发生改变。
        */
        isObject(value) ||
        this.deep
      ) {
        // set new value
        const oldValue = this.value;
        /*设置新的值*/
        this.value = value;

        /*触发回调渲染视图*/
        if (this.user) {
          try {
            this.cb.call(this.vm, value, oldValue);
          } catch (e) {
            handleError(
              e,
              this.vm,
              `callback for watcher "${this.expression}"`
            );
          }
        } else {
          this.cb.call(this.vm, value, oldValue);
        }
      }
    }
  }

  /**
   * Evaluate the value of the watcher.
   * This only gets called for lazy watchers.
   */
  /*获取观察者的值*/
  evaluate() {
    this.value = this.get();
    this.dirty = false;
  }

  /**
   * Depend on all deps collected by this watcher.
   */
  /*收集该watcher的所有deps依赖*/
  depend() {
    let i = this.deps.length;
    while (i--) {
      this.deps[i].depend();
    }
  }

  /**
   * Remove self from all dependencies' subscriber list.
   */
  /*将自身从所有依赖收集订阅列表删除*/
  teardown() {
    if (this.active) {
      // remove self from vm's watcher list
      // this is a somewhat expensive operation so we skip it
      // if the vm is being destroyed.
      /*从vm实例的观察者列表中将自身移除,由于该操作比较耗费资源,所以如果vm实例正在被销毁则跳过该步骤。*/
      if (!this.vm._isBeingDestroyed) {
        remove(this.vm._watchers, this);
      }
      let i = this.deps.length;
      while (i--) {
        this.deps[i].removeSub(this);
      }
      this.active = false;
    }
  }
}
2
3
4
5
6
7
8
9
10
11
12
13
14
15
16
17
18
19
20
21
22
23
24
25
26
27
28
29
30
31
32
33
34
35
36
37
38
39
40
41
42
43
44
45
46
47
48
49
50
51
52
53
54
55
56
57
58
59
60
61
62
63
64
65
66
67
68
69
70
71
72
73
74
75
76
77
78
79
80
81
82
83
84
85
86
87
88
89
90
91
92
93
94
95
96
97
98
99
100
101
102
103
104
105
106
107
108
109
110
111
112
113
114
115
116
117
118
119
120
121
122
123
124
125
126
127
128
129
130
131
132
133
134
135
136
137
138
139
140
141
142
143
144
145
146
147
148
149
150
151
152
153
154
155
156
157
158
159
160
161
162
163
164
165
166
167
168
169
170
171
172
173
174
175
176
177
178
179
180
181
182
183
184
185
186
187
188
189
190
191
192
193
194
195
196
197
198
199
200
201
202
203
204
205
206
207
208
209
210
211
212
213
214
215
216
217
218
219
220
221
222
223
224
225
226
227
228
229
230
231
232
233
234
235
236
237
238
239
240
241
242
243
244
245
246
247
248
249
250
251
# Dep
来看看Dep类。其实 Dep 就是一个发布者,可以订阅多个观察者,依赖收集之后 Deps 中会存在一个或多个 Watcher 对象,在数据变更的时候通知所有的 Watcher。
/**
 * A dep is an observable that can have multiple
 * directives subscribing to it.
 */
export default class Dep {
  static target: ?Watcher;
  id: number;
  subs: Array<Watcher>;

  constructor() {
    this.id = uid++;
    this.subs = [];
  }

  /*添加一个观察者对象*/
  addSub(sub: Watcher) {
    this.subs.push(sub);
  }

  /*移除一个观察者对象*/
  removeSub(sub: Watcher) {
    remove(this.subs, sub);
  }

  /*依赖收集,当存在Dep.target的时候添加观察者对象*/
  depend() {
    if (Dep.target) {
      Dep.target.addDep(this);
    }
  }

  /*通知所有订阅者*/
  notify() {
    // stabilize the subscriber list first
    const subs = this.subs.slice();
    for (let i = 0, l = subs.length; i < l; i++) {
      subs[i].update();
    }
  }
}

// the current target watcher being evaluated.
// this is globally unique because there could be only one
// watcher being evaluated at any time.
Dep.target = null;
/*依赖收集完需要将Dep.target设为null,防止后面重复添加依赖。*/
2
3
4
5
6
7
8
9
10
11
12
13
14
15
16
17
18
19
20
21
22
23
24
25
26
27
28
29
30
31
32
33
34
35
36
37
38
39
40
41
42
43
44
45
46
# defineReactive
接下来是defineReactive。defineReactive 的作用是通过 Object.defineProperty 为数据定义上 getter\setter 方法,进行依赖收集后闭包中的 Deps 会存放 Watcher 对象。触发 setter 改变数据的时候会通知 Deps 订阅者通知所有的 Watcher 观察者对象进行试图的更新。
/**
 * Define a reactive property on an Object.
 */
export function defineReactive(
  obj: Object,
  key: string,
  val: any,
  customSetter?: Function
) {
  /*在闭包中定义一个dep对象*/
  const dep = new Dep();

  const property = Object.getOwnPropertyDescriptor(obj, key);
  if (property && property.configurable === false) {
    return;
  }

  /*如果之前该对象已经预设了getter以及setter函数则将其取出来,新定义的getter/setter中会将其执行,保证不会覆盖之前已经定义的getter/setter。*/
  // cater for pre-defined getter/setters
  const getter = property && property.get;
  const setter = property && property.set;

  /*对象的子对象递归进行observe并返回子节点的Observer对象*/
  let childOb = observe(val);
  Object.defineProperty(obj, key, {
    enumerable: true,
    configurable: true,
    get: function reactiveGetter() {
      /*如果原本对象拥有getter方法则执行*/
      const value = getter ? getter.call(obj) : val;
      if (Dep.target) {
        /*进行依赖收集*/
        dep.depend();
        if (childOb) {
          /*子对象进行依赖收集,其实就是将同一个watcher观察者实例放进了两个depend中,一个是正在本身闭包中的depend,另一个是子元素的depend*/
          childOb.dep.depend();
        }
        if (Array.isArray(value)) {
          /*是数组则需要对每一个成员都进行依赖收集,如果数组的成员还是数组,则递归。*/
          dependArray(value);
        }
      }
      return value;
    },
    set: function reactiveSetter(newVal) {
      /*通过getter方法获取当前值,与新值进行比较,一致则不需要执行下面的操作*/
      const value = getter ? getter.call(obj) : val;
      /* eslint-disable no-self-compare */
      if (newVal === value || (newVal !== newVal && value !== value)) {
        return;
      }
      /* eslint-enable no-self-compare */
      if (process.env.NODE_ENV !== "production" && customSetter) {
        customSetter();
      }
      if (setter) {
        /*如果原本对象拥有setter方法则执行setter*/
        setter.call(obj, newVal);
      } else {
        val = newVal;
      }

      /*新的值需要重新进行observe,保证数据响应式*/
      childOb = observe(newVal);

      /*dep对象通知所有的观察者*/
      dep.notify();
    }
  });
}
2
3
4
5
6
7
8
9
10
11
12
13
14
15
16
17
18
19
20
21
22
23
24
25
26
27
28
29
30
31
32
33
34
35
36
37
38
39
40
41
42
43
44
45
46
47
48
49
50
51
52
53
54
55
56
57
58
59
60
61
62
63
64
65
66
67
68
69
70
现在再来看这张图是不是更清晰了呢?
# 四、事件机制
# Vue 事件 API
众所周知,Vue.js 为我们提供了四个事件 API,分别是$on,$once,$off,$emit。
# 初始化事件
初始化事件在 vm 上创建一个_events 对象,用来存放事件。_events 的内容如下:
{
  eventName: [func1, func2, func3];
}
2
3
存放事件名以及对应执行方法。
/*初始化事件*/
export function initEvents(vm: Component) {
  /*在vm上创建一个_events对象,用来存放事件。*/
  vm._events = Object.create(null);
  /*这个bool标志位来表明是否存在钩子,而不需要通过哈希表的方法来查找是否有钩子,这样做可以减少不必要的开销,优化性能。*/
  vm._hasHookEvent = false;
  // init parent attached events
  /*初始化父组件attach的事件*/
  const listeners = vm.$options._parentListeners;
  if (listeners) {
    updateComponentListeners(vm, listeners);
  }
}
2
3
4
5
6
7
8
9
10
11
12
13
# $on
$on方法用来在vm实例上监听一个自定义事件,该事件可用$emit 触发。
Vue.prototype.$on = function(
  event: string | Array<string>,
  fn: Function
): Component {
  const vm: Component = this;

  /*如果是数组的时候,则递归$on,为每一个成员都绑定上方法*/
  if (Array.isArray(event)) {
    for (let i = 0, l = event.length; i < l; i++) {
      this.$on(event[i], fn);
    }
  } else {
    (vm._events[event] || (vm._events[event] = [])).push(fn);
    // optimize hook:event cost by using a boolean flag marked at registration
    // instead of a hash lookup
    /*这里在注册事件的时候标记bool值也就是个标志位来表明存在钩子,而不需要通过哈希表的方法来查找是否有钩子,这样做可以减少不必要的开销,优化性能。*/
    if (hookRE.test(event)) {
      vm._hasHookEvent = true;
    }
  }
  return vm;
};
2
3
4
5
6
7
8
9
10
11
12
13
14
15
16
17
18
19
20
21
22
# $once
$once 监听一个只能触发一次的事件,在触发以后会自动移除该事件。
Vue.prototype.$once = function(event: string, fn: Function): Component {
  const vm: Component = this;
  function on() {
    /*在第一次执行的时候将该事件销毁*/
    vm.$off(event, on);
    /*执行注册的方法*/
    fn.apply(vm, arguments);
  }
  on.fn = fn;
  vm.$on(event, on);
  return vm;
};
2
3
4
5
6
7
8
9
10
11
12
# $off
$off 用来移除自定义事件
Vue.prototype.$off = function(
  event?: string | Array<string>,
  fn?: Function
): Component {
  const vm: Component = this;
  // all
  /*如果不传参数则注销所有事件*/
  if (!arguments.length) {
    vm._events = Object.create(null);
    return vm;
  }
  // array of events
  /*如果event是数组则递归注销事件*/
  if (Array.isArray(event)) {
    for (let i = 0, l = event.length; i < l; i++) {
      this.$off(event[i], fn);
    }
    return vm;
  }
  // specific event
  const cbs = vm._events[event];
  /*本身不存在该事件则直接返回*/
  if (!cbs) {
    return vm;
  }
  /*如果只传了event参数则注销该event方法下的所有方法*/
  if (arguments.length === 1) {
    vm._events[event] = null;
    return vm;
  }
  // specific handler
  /*遍历寻找对应方法并删除*/
  let cb;
  let i = cbs.length;
  while (i--) {
    cb = cbs[i];
    if (cb === fn || cb.fn === fn) {
      cbs.splice(i, 1);
      break;
    }
  }
  return vm;
};
2
3
4
5
6
7
8
9
10
11
12
13
14
15
16
17
18
19
20
21
22
23
24
25
26
27
28
29
30
31
32
33
34
35
36
37
38
39
40
41
42
43
# $emit
$emit 用来触发指定的自定义事件。
Vue.prototype.$emit = function(event: string): Component {
  const vm: Component = this;
  if (process.env.NODE_ENV !== "production") {
    const lowerCaseEvent = event.toLowerCase();
    if (lowerCaseEvent !== event && vm._events[lowerCaseEvent]) {
      tip(
        `Event "${lowerCaseEvent}" is emitted in component ` +
          `${formatComponentName(
            vm
          )} but the handler is registered for "${event}". ` +
          `Note that HTML attributes are case-insensitive and you cannot use ` +
          `v-on to listen to camelCase events when using in-DOM templates. ` +
          `You should probably use "${hyphenate(event)}" instead of "${event}".`
      );
    }
  }
  let cbs = vm._events[event];
  if (cbs) {
    /*将类数组的对象转换成数组*/
    cbs = cbs.length > 1 ? toArray(cbs) : cbs;
    const args = toArray(arguments, 1);
    /*遍历执行*/
    for (let i = 0, l = cbs.length; i < l; i++) {
      cbs[i].apply(vm, args);
    }
  }
  return vm;
};
2
3
4
5
6
7
8
9
10
11
12
13
14
15
16
17
18
19
20
21
22
23
24
25
26
27
28
# 五、VNode节点
# 抽象DOM树
在刀耕火种的年代,我们需要在各个事件方法中直接操作DOM来达到修改视图的目的。但是当应用一大就会变得难以维护。
那我们是不是可以把真实DOM树抽象成一棵以JavaScript对象构成的抽象树,在修改抽象树数据后将抽象树转化成真实DOM重绘到页面上呢?于是虚拟DOM出现了,它是真实DOM的一层抽象,用属性描述真实DOM的各个特性。当它发生变化的时候,就会去修改视图。
可以想象,最简单粗暴的方法就是将整个DOM结构用innerHTML修改到页面上,但是这样进行重绘整个视图层是相当消耗性能的,我们是不是可以每次只更新它的修改呢?所以Vue.js将DOM抽象成一个以JavaScript对象为节点的虚拟DOM树,以VNode节点模拟真实DOM,可以对这颗抽象树进行创建节点、删除节点以及修改节点等操作,在这过程中都不需要操作真实DOM,只需要操作JavaScript对象后只对差异修改,相对于整块的innerHTML的粗暴式修改,大大提升了性能。修改以后经过diff算法得出一些需要修改的最小单位,再将这些小单位的视图进行更新。这样做减少了很多不需要的DOM操作,大大提高了性能。
Vue就使用了这样的抽象节点VNode,它是对真实DOM的一层抽象,而不依赖某个平台,它可以是浏览器平台,也可以是weex,甚至是node平台也可以对这样一棵抽象DOM树进行创建删除修改等操作,这也为前后端同构提供了可能。
# VNode基类
先来看一下Vue.js源码中对VNode类的定义。这是一个最基础的VNode节点,作为其他派生VNode类的基类,里面定义了下面这些数据。
export default class VNode {
  tag: string | void;
  data: VNodeData | void;
  children: ?Array<VNode>;
  text: string | void;
  elm: Node | void;
  ns: string | void;
  context: Component | void; // rendered in this component's scope
  functionalContext: Component | void; // only for functional component root nodes
  key: string | number | void;
  componentOptions: VNodeComponentOptions | void;
  componentInstance: Component | void; // component instance
  parent: VNode | void; // component placeholder node
  raw: boolean; // contains raw HTML? (server only)
  isStatic: boolean; // hoisted static node
  isRootInsert: boolean; // necessary for enter transition check
  isComment: boolean; // empty comment placeholder?
  isCloned: boolean; // is a cloned node?
  isOnce: boolean; // is a v-once node?

  constructor (
    tag?: string,
    data?: VNodeData,
    children?: ?Array<VNode>,
    text?: string,
    elm?: Node,
    context?: Component,
    componentOptions?: VNodeComponentOptions
  ) {
    /*当前节点的标签名*/
    this.tag = tag
    /*当前节点对应的对象,包含了具体的一些数据信息,是一个VNodeData类型,可以参考VNodeData类型中的数据信息*/
    this.data = data
    /*当前节点的子节点,是一个数组*/
    this.children = children
    /*当前节点的文本*/
    this.text = text
    /*当前虚拟节点对应的真实dom节点*/
    this.elm = elm
    /*当前节点的名字空间*/
    this.ns = undefined
    /*编译作用域*/
    this.context = context
    /*函数化组件作用域*/
    this.functionalContext = undefined
    /*节点的key属性,被当作节点的标志,用以优化*/
    this.key = data && data.key
    /*组件的option选项*/
    this.componentOptions = componentOptions
    /*当前节点对应的组件的实例*/
    this.componentInstance = undefined
    /*当前节点的父节点*/
    this.parent = undefined
    /*简而言之就是是否为原生HTML或只是普通文本,innerHTML的时候为true,textContent的时候为false*/
    this.raw = false
    /*静态节点标志*/
    this.isStatic = false
    /*是否作为根节点插入*/
    this.isRootInsert = true
    /*是否为注释节点*/
    this.isComment = false
    /*是否为克隆节点*/
    this.isCloned = false
    /*是否有v-once指令*/
    this.isOnce = false
  }

  // DEPRECATED: alias for componentInstance for backwards compat.
  /* istanbul ignore next */
  get child (): Component | void {
    return this.componentInstance
  }
}
2
3
4
5
6
7
8
9
10
11
12
13
14
15
16
17
18
19
20
21
22
23
24
25
26
27
28
29
30
31
32
33
34
35
36
37
38
39
40
41
42
43
44
45
46
47
48
49
50
51
52
53
54
55
56
57
58
59
60
61
62
63
64
65
66
67
68
69
70
71
72
73
打个比方,比如说我现在有这么一个VNode树
{
  tag: "div",
  data: {
    class: "test"
  },
  children: [
    {
      tag: "span",
      data: {
        class: "demo"
      },
      text: "hello,VNode"
    }
  ]
}
2
3
4
5
6
7
8
9
10
11
12
13
14
15
渲染之后的结果就是这样的
<div class="test">
    <span class="demo">hello,VNode</span>
</div>
2
3
# 生成一个新的VNode的方法
下面这些方法都是一些常用的构造VNode的方法。
# createEmptyVNode 创建一个空VNode节点
/*创建一个空VNode节点*/
export const createEmptyVNode = () => {
  const node = new VNode()
  node.text = ''
  node.isComment = true
  return node
}
2
3
4
5
6
7
# createTextVNode 创建一个文本节点
/*创建一个文本节点*/
export function createTextVNode (val: string | number) {
  return new VNode(undefined, undefined, undefined, String(val))
}
2
3
4
# createComponent 创建一个组件节点
// plain options object: turn it into a constructor
if (isObject(Ctor)) {
  Ctor = baseCtor.extend(Ctor);
}

// if at this stage it's not a constructor or an async component factory,
// reject
/*如果在该阶段Ctor依然不是一个构造函数或者是一个异步组件工厂则直接返回*/
if (typeof Ctor !== "function") {
  if (process.env.NODE_ENV !== "production") {
    warn(`Invalid Component definition: ${String(Ctor)}`, context);
  }
  return;
}

// async component
/*处理异步组件*/
if (isUndef(Ctor.cid)) {
  Ctor = resolveAsyncComponent(Ctor, baseCtor, context);
  if (Ctor === undefined) {
    // return nothing if this is indeed an async component
    // wait for the callback to trigger parent update.
    /*如果这是一个异步组件则会不会返回任何东西(undifiened),直接return掉,等待回调函数去触发父组件更新。s*/
    return;
  }
}

// resolve constructor options in case global mixins are applied after
// component constructor creation
resolveConstructorOptions(Ctor);

data = data || {};

// transform component v-model data into props & events
if (isDef(data.model)) {
  transformModel(Ctor.options, data);
}

// extract props
const propsData = extractPropsFromVNodeData(data, Ctor, tag);

// functional component
if (isTrue(Ctor.options.functional)) {
  return createFunctionalComponent(Ctor, propsData, data, context, children);
}

// extract listeners, since these needs to be treated as
// child component listeners instead of DOM listeners
const listeners = data.on;
// replace with listeners with .native modifier
data.on = data.nativeOn;

if (isTrue(Ctor.options.abstract)) {
  // abstract components do not keep anything
  // other than props & listeners
  data = {};
}

// merge component management hooks onto the placeholder node
mergeHooks(data);

// return a placeholder vnode
const name = Ctor.options.name || tag;
const vnode = new VNode(
  `vue-component-${Ctor.cid}${name ? `-${name}` : ""}`,
  data,
  undefined,
  undefined,
  undefined,
  context,
  { Ctor, propsData, listeners, tag, children }
);
return vnode;
2
3
4
5
6
7
8
9
10
11
12
13
14
15
16
17
18
19
20
21
22
23
24
25
26
27
28
29
30
31
32
33
34
35
36
37
38
39
40
41
42
43
44
45
46
47
48
49
50
51
52
53
54
55
56
57
58
59
60
61
62
63
64
65
66
67
68
69
70
71
72
73
# cloneVNode 克隆一个VNode节点
export function cloneVNode (vnode: VNode): VNode {
  const cloned = new VNode(
    vnode.tag,
    vnode.data,
    vnode.children,
    vnode.text,
    vnode.elm,
    vnode.context,
    vnode.componentOptions
  )
  cloned.ns = vnode.ns
  cloned.isStatic = vnode.isStatic
  cloned.key = vnode.key
  cloned.isCloned = true
  return cloned
}
2
3
4
5
6
7
8
9
10
11
12
13
14
15
16
# createElement
// wrapper function for providing a more flexible interface
// without getting yelled at by flow
export function createElement (
  context: Component,
  tag: any,
  data: any,
  children: any,
  normalizationType: any,
  alwaysNormalize: boolean
): VNode {
  /*兼容不传data的情况*/
  if (Array.isArray(data) || isPrimitive(data)) {
    normalizationType = children
    children = data
    data = undefined
  }
  /*如果alwaysNormalize为true,则normalizationType标记为ALWAYS_NORMALIZE*/
  if (isTrue(alwaysNormalize)) {
    normalizationType = ALWAYS_NORMALIZE
  }
  /*创建虚拟节点*/
  return _createElement(context, tag, data, children, normalizationType)
}

/*创建虚拟节点*/
export function _createElement (
  context: Component,
  tag?: string | Class<Component> | Function | Object,
  data?: VNodeData,
  children?: any,
  normalizationType?: number
): VNode {
  /*
    如果传递data参数且data的__ob__已经定义(代表已经被observed,上面绑定了Oberver对象),
    https://cn.vuejs.org/v2/guide/render-function.html#约束
    那么创建一个空节点
  */
  if (isDef(data) && isDef((data: any).__ob__)) {
    process.env.NODE_ENV !== 'production' && warn(
      `Avoid using observed data object as vnode data: ${JSON.stringify(data)}\n` +
      'Always create fresh vnode data objects in each render!',
      context
    )
    return createEmptyVNode()
  }
  /*如果tag不存在也是创建一个空节点*/
  if (!tag) {
    // in case of component :is set to falsy value
    return createEmptyVNode()
  }
  // support single function children as default scoped slot
  /*默认默认作用域插槽*/
  if (Array.isArray(children) &&
      typeof children[0] === 'function') {
    data = data || {}
    data.scopedSlots = { default: children[0] }
    children.length = 0
  }
  if (normalizationType === ALWAYS_NORMALIZE) {
    children = normalizeChildren(children)
  } else if (normalizationType === SIMPLE_NORMALIZE) {
    children = simpleNormalizeChildren(children)
  }
  let vnode, ns
  if (typeof tag === 'string') {
    let Ctor
    /*获取tag的名字空间*/
    ns = config.getTagNamespace(tag)
    /*判断是否是保留的标签*/
    if (config.isReservedTag(tag)) {
      // platform built-in elements
      /*如果是保留的标签则创建一个相应节点*/
      vnode = new VNode(
        config.parsePlatformTagName(tag), data, children,
        undefined, undefined, context
      )
    } else if (isDef(Ctor = resolveAsset(context.$options, 'components', tag))) {
      // component
      /*从vm实例的option的components中寻找该tag,存在则就是一个组件,创建相应节点,Ctor为组件的构造类*/
      vnode = createComponent(Ctor, data, context, children, tag)
    } else {
      // unknown or unlisted namespaced elements
      // check at runtime because it may get assigned a namespace when its
      // parent normalizes children
      /*未知的元素,在运行时检查,因为父组件可能在序列化子组件的时候分配一个名字空间*/
      vnode = new VNode(
        tag, data, children,
        undefined, undefined, context
      )
    }
  } else {
    // direct component options / constructor
    /*tag不是字符串的时候则是组件的构造类*/
    vnode = createComponent(tag, data, context, children)
  }
  if (isDef(vnode)) {
    /*如果有名字空间,则递归所有子节点应用该名字空间*/
    if (ns) applyNS(vnode, ns)
    return vnode
  } else {
    /*如果vnode没有成功创建则创建空节点*/
    return createEmptyVNode()
  }
}
2
3
4
5
6
7
8
9
10
11
12
13
14
15
16
17
18
19
20
21
22
23
24
25
26
27
28
29
30
31
32
33
34
35
36
37
38
39
40
41
42
43
44
45
46
47
48
49
50
51
52
53
54
55
56
57
58
59
60
61
62
63
64
65
66
67
68
69
70
71
72
73
74
75
76
77
78
79
80
81
82
83
84
85
86
87
88
89
90
91
92
93
94
95
96
97
98
99
100
101
102
103
104
createElement用来创建一个虚拟节点。当data上已经绑定__ob__的时候,代表该对象已经被Oberver过了,所以创建一个空节点。tag不存在的时候同样创建一个空节点。当tag不是一个String类型的时候代表tag是一个组件的构造类,直接用new VNode创建。当tag是String类型的时候,如果是保留标签,则用new VNode创建一个VNode实例,如果在vm的option的components找得到该tag,代表这是一个组件,否则统一用new VNode创建。
# 六、VirtualDOM与diff(Vue实现)
# 修改视图
众所周知,Vue通过数据绑定来修改视图,当某个数据被修改的时候,set方法会让闭包中的Dep调用notify通知所有订阅者Watcher,Watcher通过get方法执行vm._update(vm._render(), hydrating)。
这里看一下_update方法
Vue.prototype._update = function (vnode: VNode, hydrating?: boolean) {
    const vm: Component = this
    /*如果已经该组件已经挂载过了则代表进入这个步骤是个更新的过程,触发beforeUpdate钩子*/
    if (vm._isMounted) {
      callHook(vm, 'beforeUpdate')
    }
    const prevEl = vm.$el
    const prevVnode = vm._vnode
    const prevActiveInstance = activeInstance
    activeInstance = vm
    vm._vnode = vnode
    // Vue.prototype.__patch__ is injected in entry points
    // based on the rendering backend used.
    /*基于后端渲染Vue.prototype.__patch__被用来作为一个入口*/
    if (!prevVnode) {
      // initial render
      vm.$el = vm.__patch__(
        vm.$el, vnode, hydrating, false /* removeOnly */,
        vm.$options._parentElm,
        vm.$options._refElm
      )
    } else {
      // updates
      vm.$el = vm.__patch__(prevVnode, vnode)
    }
    activeInstance = prevActiveInstance
    // update __vue__ reference
    /*更新新的实例对象的__vue__*/
    if (prevEl) {
      prevEl.__vue__ = null
    }
    if (vm.$el) {
      vm.$el.__vue__ = vm
    }
    // if parent is an HOC, update its $el as well
    if (vm.$vnode && vm.$parent && vm.$vnode === vm.$parent._vnode) {
      vm.$parent.$el = vm.$el
    }
    // updated hook is called by the scheduler to ensure that children are
    // updated in a parent's updated hook.
  }
2
3
4
5
6
7
8
9
10
11
12
13
14
15
16
17
18
19
20
21
22
23
24
25
26
27
28
29
30
31
32
33
34
35
36
37
38
39
40
41
update方法的第一个参数是一个VNode对象,在内部会将该VNode对象与之前旧的VNode对象进行__patch_。
什么是__patch__呢?
# patch
patch将新老VNode节点进行比对,然后将根据两者的比较结果进行最小单位地修改视图,而不是将整个视图根据新的VNode重绘。patch的核心在于diff算法,这套算法可以高效地比较virtual DOM的变更,得出变化以修改视图。
那么patch如何工作的呢?
首先说一下patch的核心diff算法,diff算法是通过同层的树节点进行比较而非对树进行逐层搜索遍历的方式,所以时间复杂度只有O(n),是一种相当高效的算法。
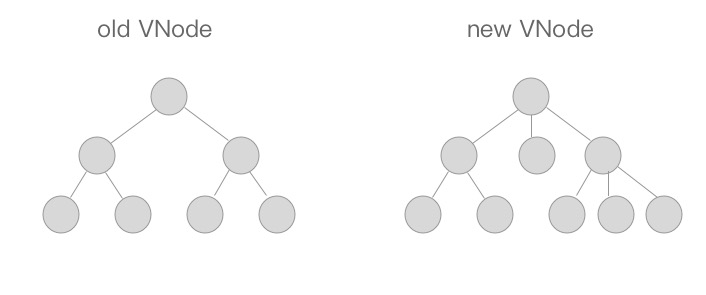
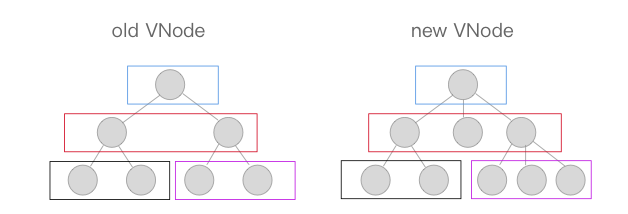
这两张图代表旧的VNode与新VNode进行patch的过程,他们只是在同层级的VNode之间进行比较得到变化(第二张图中相同颜色的方块代表互相进行比较的VNode节点),然后修改变化的视图,所以十分高效。
让我们看一下patch的代码。
  /*createPatchFunction的返回值,一个patch函数*/
  return function patch (oldVnode, vnode, hydrating, removeOnly, parentElm, refElm) {
    /*vnode不存在则直接调用销毁钩子*/
    if (isUndef(vnode)) {
      if (isDef(oldVnode)) invokeDestroyHook(oldVnode)
      return
    }

    let isInitialPatch = false
    const insertedVnodeQueue = []

    if (isUndef(oldVnode)) {
      // empty mount (likely as component), create new root element
      /*oldVnode未定义的时候,其实也就是root节点,创建一个新的节点*/
      isInitialPatch = true
      createElm(vnode, insertedVnodeQueue, parentElm, refElm)
    } else {
      /*标记旧的VNode是否有nodeType*/
      const isRealElement = isDef(oldVnode.nodeType)
      if (!isRealElement && sameVnode(oldVnode, vnode)) {
        // patch existing root node
        /*是同一个节点的时候直接修改现有的节点*/
        patchVnode(oldVnode, vnode, insertedVnodeQueue, removeOnly)
      } else {
        if (isRealElement) {
          // mounting to a real element
          // check if this is server-rendered content and if we can perform
          // a successful hydration.
          if (oldVnode.nodeType === 1 && oldVnode.hasAttribute(SSR_ATTR)) {
            /*当旧的VNode是服务端渲染的元素,hydrating记为true*/
            oldVnode.removeAttribute(SSR_ATTR)
            hydrating = true
          }
          if (isTrue(hydrating)) {
            /*需要合并到真实DOM上*/
            if (hydrate(oldVnode, vnode, insertedVnodeQueue)) {
              /*调用insert钩子*/
              invokeInsertHook(vnode, insertedVnodeQueue, true)
              return oldVnode
            } else if (process.env.NODE_ENV !== 'production') {
              warn(
                'The client-side rendered virtual DOM tree is not matching ' +
                'server-rendered content. This is likely caused by incorrect ' +
                'HTML markup, for example nesting block-level elements inside ' +
                '<p>, or missing <tbody>. Bailing hydration and performing ' +
                'full client-side render.'
              )
            }
          }
          // either not server-rendered, or hydration failed.
          // create an empty node and replace it
          /*如果不是服务端渲染或者合并到真实DOM失败,则创建一个空的VNode节点替换它*/
          oldVnode = emptyNodeAt(oldVnode)
        }
        // replacing existing element
        /*取代现有元素*/
        const oldElm = oldVnode.elm
        const parentElm = nodeOps.parentNode(oldElm)
        createElm(
          vnode,
          insertedVnodeQueue,
          // extremely rare edge case: do not insert if old element is in a
          // leaving transition. Only happens when combining transition +
          // keep-alive + HOCs. (#4590)
          oldElm._leaveCb ? null : parentElm,
          nodeOps.nextSibling(oldElm)
        )

        if (isDef(vnode.parent)) {
          // component root element replaced.
          // update parent placeholder node element, recursively
          /*组件根节点被替换,遍历更新父节点element*/
          let ancestor = vnode.parent
          while (ancestor) {
            ancestor.elm = vnode.elm
            ancestor = ancestor.parent
          }
          if (isPatchable(vnode)) {
            /*调用create回调*/
            for (let i = 0; i < cbs.create.length; ++i) {
              cbs.create[i](emptyNode, vnode.parent)
            }
          }
        }

        if (isDef(parentElm)) {
          /*移除老节点*/
          removeVnodes(parentElm, [oldVnode], 0, 0)
        } else if (isDef(oldVnode.tag)) {
          /*调用destroy钩子*/
          invokeDestroyHook(oldVnode)
        }
      }
    }

    /*调用insert钩子*/
    invokeInsertHook(vnode, insertedVnodeQueue, isInitialPatch)
    return vnode.elm
  }
2
3
4
5
6
7
8
9
10
11
12
13
14
15
16
17
18
19
20
21
22
23
24
25
26
27
28
29
30
31
32
33
34
35
36
37
38
39
40
41
42
43
44
45
46
47
48
49
50
51
52
53
54
55
56
57
58
59
60
61
62
63
64
65
66
67
68
69
70
71
72
73
74
75
76
77
78
79
80
81
82
83
84
85
86
87
88
89
90
91
92
93
94
95
96
97
98
99
从代码中不难发现,当oldVnode与vnode在sameVnode的时候才会进行patchVnode,也就是新旧VNode节点判定为同一节点的时候才会进行patchVnode这个过程,否则就是创建新的DOM,移除旧的DOM。
怎么样的节点算sameVnode呢?
# sameVnode
我们来看一下sameVnode的实现。
/*
  判断两个VNode节点是否是同一个节点,需要满足以下条件
  key相同
  tag(当前节点的标签名)相同
  isComment(是否为注释节点)相同
  是否data(当前节点对应的对象,包含了具体的一些数据信息,是一个VNodeData类型,可以参考VNodeData类型中的数据信息)都有定义
  当标签是<input>的时候,type必须相同
*/
function sameVnode (a, b) {
  return (
    a.key === b.key &&
    a.tag === b.tag &&
    a.isComment === b.isComment &&
    isDef(a.data) === isDef(b.data) &&
    sameInputType(a, b)
  )
}

// Some browsers do not support dynamically changing type for <input>
// so they need to be treated as different nodes
/*
  判断当标签是<input>的时候,type是否相同
  某些浏览器不支持动态修改<input>类型,所以他们被视为不同节点
*/
function sameInputType (a, b) {
  if (a.tag !== 'input') return true
  let i
  const typeA = isDef(i = a.data) && isDef(i = i.attrs) && i.type
  const typeB = isDef(i = b.data) && isDef(i = i.attrs) && i.type
  return typeA === typeB
}
2
3
4
5
6
7
8
9
10
11
12
13
14
15
16
17
18
19
20
21
22
23
24
25
26
27
28
29
30
31
当两个VNode的tag、key、isComment都相同,并且同时定义或未定义data的时候,且如果标签为input则type必须相同。这时候这两个VNode则算sameVnode,可以直接进行patchVnode操作。
# patchVnode
还是先来看一下patchVnode的代码。
  /*patch VNode节点*/
  function patchVnode (oldVnode, vnode, insertedVnodeQueue, removeOnly) {
    /*两个VNode节点相同则直接返回*/
    if (oldVnode === vnode) {
      return
    }
    // reuse element for static trees.
    // note we only do this if the vnode is cloned -
    // if the new node is not cloned it means the render functions have been
    // reset by the hot-reload-api and we need to do a proper re-render.
    /*
      如果新旧VNode都是静态的,同时它们的key相同(代表同一节点),
      并且新的VNode是clone或者是标记了once(标记v-once属性,只渲染一次),
      那么只需要替换elm以及componentInstance即可。
    */
    if (isTrue(vnode.isStatic) &&
        isTrue(oldVnode.isStatic) &&
        vnode.key === oldVnode.key &&
        (isTrue(vnode.isCloned) || isTrue(vnode.isOnce))) {
      vnode.elm = oldVnode.elm
      vnode.componentInstance = oldVnode.componentInstance
      return
    }
    let i
    const data = vnode.data
    if (isDef(data) && isDef(i = data.hook) && isDef(i = i.prepatch)) {
      /*i = data.hook.prepatch,如果存在的话,见"./create-component componentVNodeHooks"。*/
      i(oldVnode, vnode)
    }
    const elm = vnode.elm = oldVnode.elm
    const oldCh = oldVnode.children
    const ch = vnode.children
    if (isDef(data) && isPatchable(vnode)) {
      /*调用update回调以及update钩子*/
      for (i = 0; i < cbs.update.length; ++i) cbs.update[i](oldVnode, vnode)
      if (isDef(i = data.hook) && isDef(i = i.update)) i(oldVnode, vnode)
    }
    /*如果这个VNode节点没有text文本时*/
    if (isUndef(vnode.text)) {
      if (isDef(oldCh) && isDef(ch)) {
        /*新老节点均有children子节点,则对子节点进行diff操作,调用updateChildren*/
        if (oldCh !== ch) updateChildren(elm, oldCh, ch, insertedVnodeQueue, removeOnly)
      } else if (isDef(ch)) {
        /*如果老节点没有子节点而新节点存在子节点,先清空elm的文本内容,然后为当前节点加入子节点*/
        if (isDef(oldVnode.text)) nodeOps.setTextContent(elm, '')
        addVnodes(elm, null, ch, 0, ch.length - 1, insertedVnodeQueue)
      } else if (isDef(oldCh)) {
        /*当新节点没有子节点而老节点有子节点的时候,则移除所有ele的子节点*/
        removeVnodes(elm, oldCh, 0, oldCh.length - 1)
      } else if (isDef(oldVnode.text)) {
        /*当新老节点都无子节点的时候,只是文本的替换,因为这个逻辑中新节点text不存在,所以直接去除ele的文本*/
        nodeOps.setTextContent(elm, '')
      }
    } else if (oldVnode.text !== vnode.text) {
      /*当新老节点text不一样时,直接替换这段文本*/
      nodeOps.setTextContent(elm, vnode.text)
    }
    /*调用postpatch钩子*/
    if (isDef(data)) {
      if (isDef(i = data.hook) && isDef(i = i.postpatch)) i(oldVnode, vnode)
    }
  }
2
3
4
5
6
7
8
9
10
11
12
13
14
15
16
17
18
19
20
21
22
23
24
25
26
27
28
29
30
31
32
33
34
35
36
37
38
39
40
41
42
43
44
45
46
47
48
49
50
51
52
53
54
55
56
57
58
59
60
61
62
patchVnode的规则是这样的:
1.如果新旧VNode都是静态的,同时它们的key相同(代表同一节点),并且新的VNode是clone或者是标记了once(标记v-once属性,只渲染一次),那么只需要替换elm以及componentInstance即可。
2.新老节点均有children子节点,则对子节点进行diff操作,调用updateChildren,这个updateChildren也是diff的核心。
3.如果老节点没有子节点而新节点存在子节点,先清空老节点DOM的文本内容,然后为当前DOM节点加入子节点。
4.当新节点没有子节点而老节点有子节点的时候,则移除该DOM节点的所有子节点。
5.当新老节点都无子节点的时候,只是文本的替换。
# updateChildren
function updateChildren (parentElm, oldCh, newCh, insertedVnodeQueue, removeOnly) {
let oldStartIdx = 0
let newStartIdx = 0
let oldEndIdx = oldCh.length - 1
let oldStartVnode = oldCh[0]
let oldEndVnode = oldCh[oldEndIdx]
let newEndIdx = newCh.length - 1
let newStartVnode = newCh[0]
let newEndVnode = newCh[newEndIdx]
let oldKeyToIdx, idxInOld, elmToMove, refElm
// removeOnly is a special flag used only by <transition-group>
// to ensure removed elements stay in correct relative positions
// during leaving transitions
const canMove = !removeOnly
while (oldStartIdx <= oldEndIdx && newStartIdx <= newEndIdx) {
if (isUndef(oldStartVnode)) {
oldStartVnode = oldCh[++oldStartIdx] // Vnode has been moved left
} else if (isUndef(oldEndVnode)) {
oldEndVnode = oldCh[--oldEndIdx]
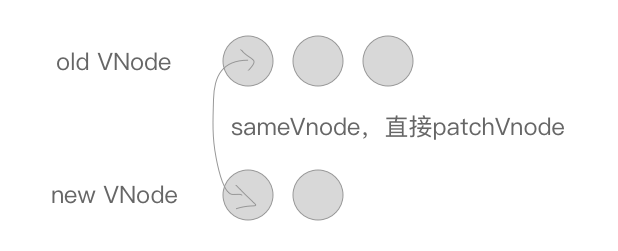
} else if (sameVnode(oldStartVnode, newStartVnode)) {
/*前四种情况其实是指定key的时候,判定为同一个VNode,则直接patchVnode即可,分别比较oldCh以及newCh的两头节点2*2=4种情况*/
patchVnode(oldStartVnode, newStartVnode, insertedVnodeQueue)
oldStartVnode = oldCh[++oldStartIdx]
newStartVnode = newCh[++newStartIdx]
} else if (sameVnode(oldEndVnode, newEndVnode)) {
patchVnode(oldEndVnode, newEndVnode, insertedVnodeQueue)
oldEndVnode = oldCh[--oldEndIdx]
newEndVnode = newCh[--newEndIdx]
} else if (sameVnode(oldStartVnode, newEndVnode)) { // Vnode moved right
patchVnode(oldStartVnode, newEndVnode, insertedVnodeQueue)
canMove && nodeOps.insertBefore(parentElm, oldStartVnode.elm, nodeOps.nextSibling(oldEndVnode.elm))
oldStartVnode = oldCh[++oldStartIdx]
newEndVnode = newCh[--newEndIdx]
} else if (sameVnode(oldEndVnode, newStartVnode)) { // Vnode moved left
patchVnode(oldEndVnode, newStartVnode, insertedVnodeQueue)
canMove && nodeOps.insertBefore(parentElm, oldEndVnode.elm, oldStartVnode.elm)
oldEndVnode = oldCh[--oldEndIdx]
newStartVnode = newCh[++newStartIdx]
} else {
/*
生成一个key与旧VNode的key对应的哈希表(只有第一次进来undefined的时候会生成,也为后面检测重复的key值做铺垫)
比如childre是这样的 [{xx: xx, key: 'key0'}, {xx: xx, key: 'key1'}, {xx: xx, key: 'key2'}] beginIdx = 0 endIdx = 2
结果生成{key0: 0, key1: 1, key2: 2}
*/
if (isUndef(oldKeyToIdx)) oldKeyToIdx = createKeyToOldIdx(oldCh, oldStartIdx, oldEndIdx)
/*如果newStartVnode新的VNode节点存在key并且这个key在oldVnode中能找到则返回这个节点的idxInOld(即第几个节点,下标)*/
idxInOld = isDef(newStartVnode.key) ? oldKeyToIdx[newStartVnode.key] : null
if (isUndef(idxInOld)) { // New element
/*newStartVnode没有key或者是该key没有在老节点中找到则创建一个新的节点*/
createElm(newStartVnode, insertedVnodeQueue, parentElm, oldStartVnode.elm)
newStartVnode = newCh[++newStartIdx]
} else {
/*获取同key的老节点*/
elmToMove = oldCh[idxInOld]
/* istanbul ignore if */
if (process.env.NODE_ENV !== 'production' && !elmToMove) {
/*如果elmToMove不存在说明之前已经有新节点放入过这个key的DOM中,提示可能存在重复的key,确保v-for的时候item有唯一的key值*/
warn(
'It seems there are duplicate keys that is causing an update error. ' +
'Make sure each v-for item has a unique key.'
)
}
if (sameVnode(elmToMove, newStartVnode)) {
/*如果新VNode与得到的有相同key的节点是同一个VNode则进行patchVnode*/
patchVnode(elmToMove, newStartVnode, insertedVnodeQueue)
/*因为已经patchVnode进去了,所以将这个老节点赋值undefined,之后如果还有新节点与该节点key相同可以检测出来提示已有重复的key*/
oldCh[idxInOld] = undefined
/*当有标识位canMove实可以直接插入oldStartVnode对应的真实DOM节点前面*/
canMove && nodeOps.insertBefore(parentElm, newStartVnode.elm, oldStartVnode.elm)
newStartVnode = newCh[++newStartIdx]
} else {
// same key but different element. treat as new element
/*当新的VNode与找到的同样key的VNode不是sameVNode的时候(比如说tag不一样或者是有不一样type的input标签),创建一个新的节点*/
createElm(newStartVnode, insertedVnodeQueue, parentElm, oldStartVnode.elm)
newStartVnode = newCh[++newStartIdx]
}
}
}
}
if (oldStartIdx > oldEndIdx) {
/*全部比较完成以后,发现oldStartIdx > oldEndIdx的话,说明老节点已经遍历完了,新节点比老节点多,所以这时候多出来的新节点需要一个一个创建出来加入到真实DOM中*/
refElm = isUndef(newCh[newEndIdx + 1]) ? null : newCh[newEndIdx + 1].elm
addVnodes(parentElm, refElm, newCh, newStartIdx, newEndIdx, insertedVnodeQueue)
} else if (newStartIdx > newEndIdx) {
/*如果全部比较完成以后发现newStartIdx > newEndIdx,则说明新节点已经遍历完了,老节点多余新节点,这个时候需要将多余的老节点从真实DOM中移除*/
removeVnodes(parentElm, oldCh, oldStartIdx, oldEndIdx)
}
}
2
3
4
5
6
7
8
9
10
11
12
13
14
15
16
17
18
19
20
21
22
23
24
25
26
27
28
29
30
31
32
33
34
35
36
37
38
39
40
41
42
43
44
45
46
47
48
49
50
51
52
53
54
55
56
57
58
59
60
61
62
63
64
65
66
67
68
69
70
71
72
73
74
75
76
77
78
79
80
81
82
83
84
85
86
87
88
89
90
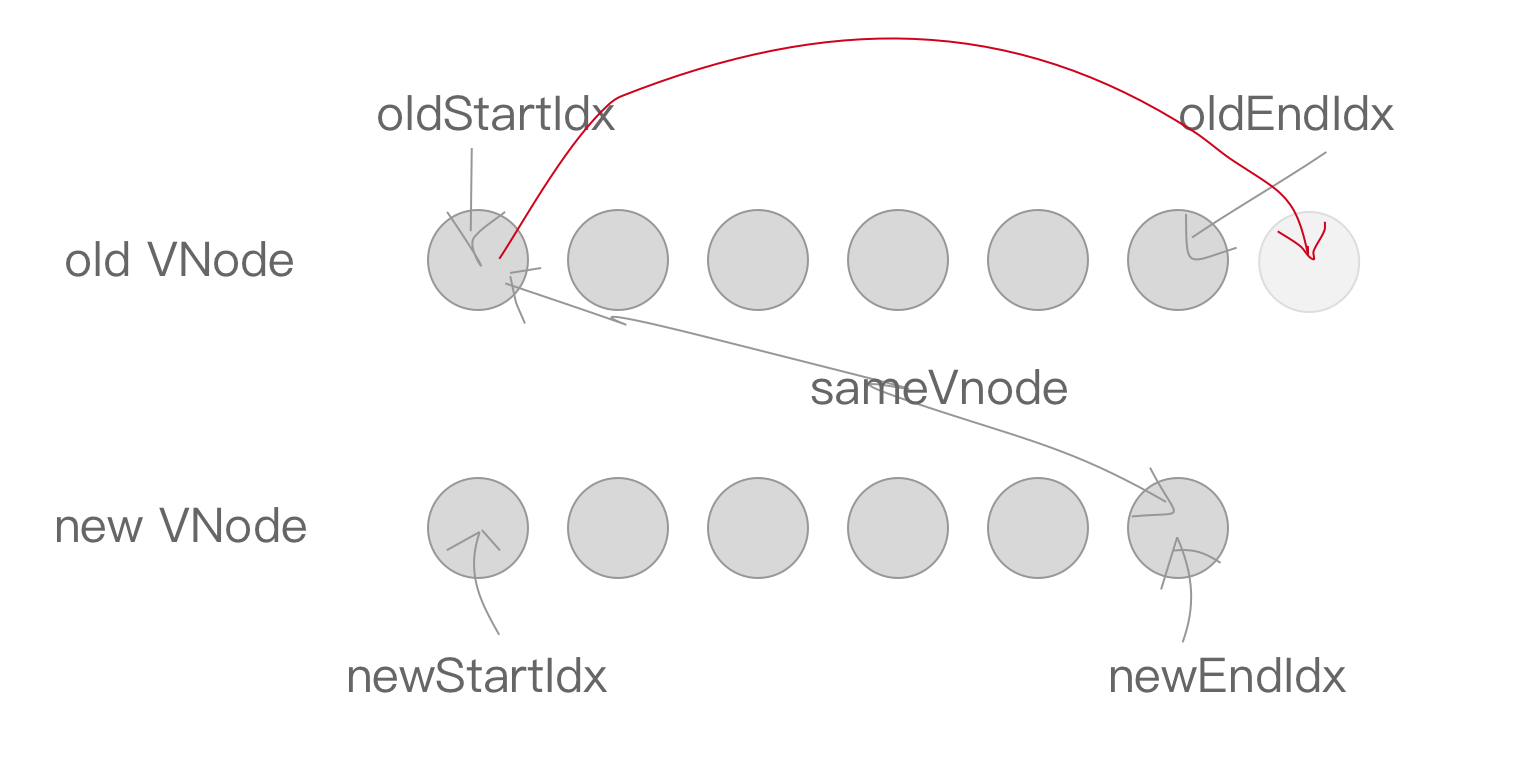
直接看源码可能比较难以捋清其中的关系,我们通过图来看一下。
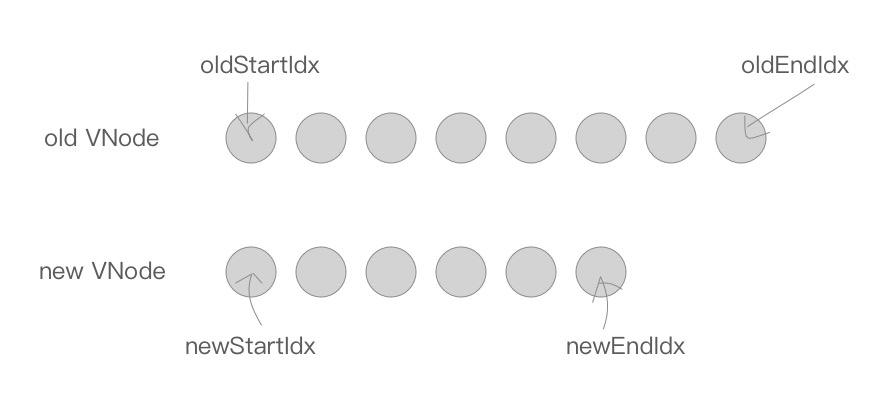
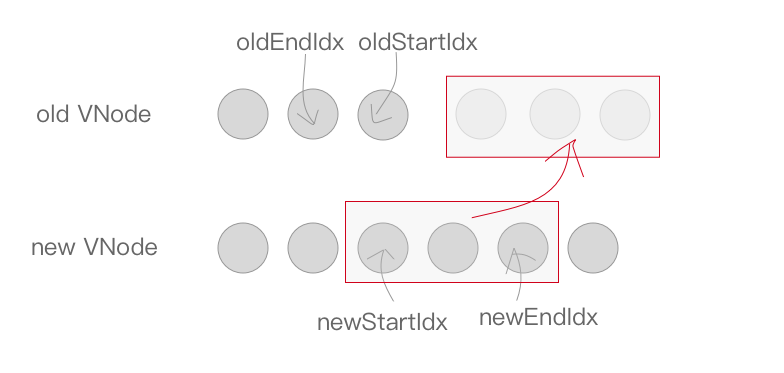
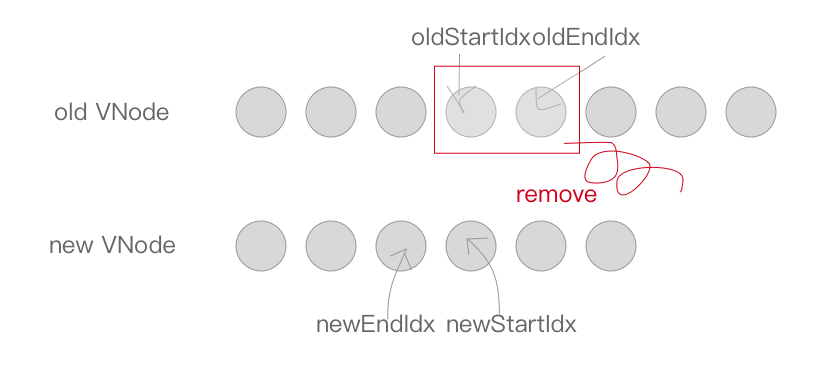
首先,在新老两个VNode节点的左右头尾两侧都有一个变量标记,在遍历过程中这几个变量都会向中间靠拢。当oldStartIdx > oldEndIdx或者newStartIdx > newEndIdx时结束循环。
索引与VNode节点的对应关系: oldStartIdx => oldStartVnode oldEndIdx => oldEndVnode newStartIdx => newStartVnode newEndIdx => newEndVnode
在遍历中,如果存在key,并且满足sameVnode,会将该DOM节点进行复用,否则则会创建一个新的DOM节点。
首先,oldStartVnode、oldEndVnode与newStartVnode、newEndVnode两两比较一共有2*2=4种比较方法。
当新老VNode节点的start或者end满足sameVnode时,也就是sameVnode(oldStartVnode, newStartVnode)或者sameVnode(oldEndVnode, newEndVnode),直接将该VNode节点进行patchVnode即可。
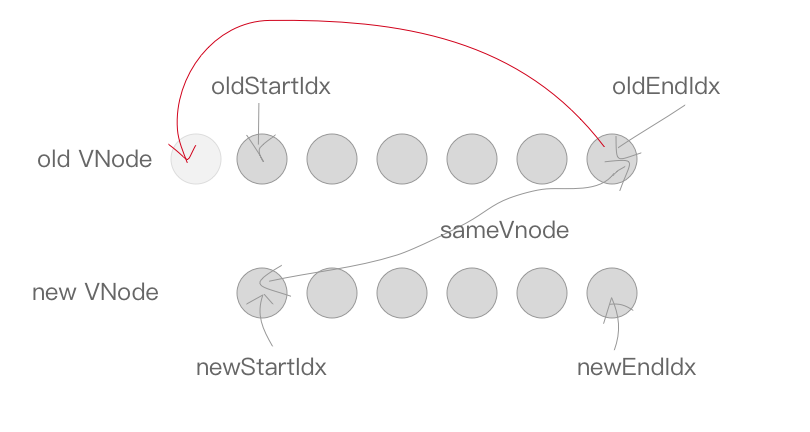
如果oldStartVnode与newEndVnode满足sameVnode,即sameVnode(oldStartVnode, newEndVnode)。
这时候说明oldStartVnode已经跑到了oldEndVnode后面去了,进行patchVnode的同时还需要将真实DOM节点移动到oldEndVnode的后面。
如果oldEndVnode与newStartVnode满足sameVnode,即sameVnode(oldEndVnode, newStartVnode)。
这说明oldEndVnode跑到了oldStartVnode的前面,进行patchVnode的同时真实的DOM节点移动到了oldStartVnode的前面。
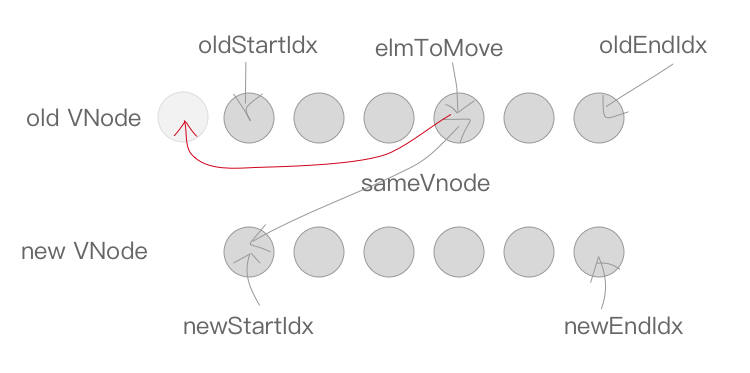
如果以上情况均不符合,则通过createKeyToOldIdx会得到一个oldKeyToIdx,里面存放了一个key为旧的VNode,value为对应index序列的哈希表。从这个哈希表中可以找到是否有与newStartVnode一致key的旧的VNode节点,如果同时满足sameVnode,patchVnode的同时会将这个真实DOM(elmToMove)移动到oldStartVnode对应的真实DOM的前面。
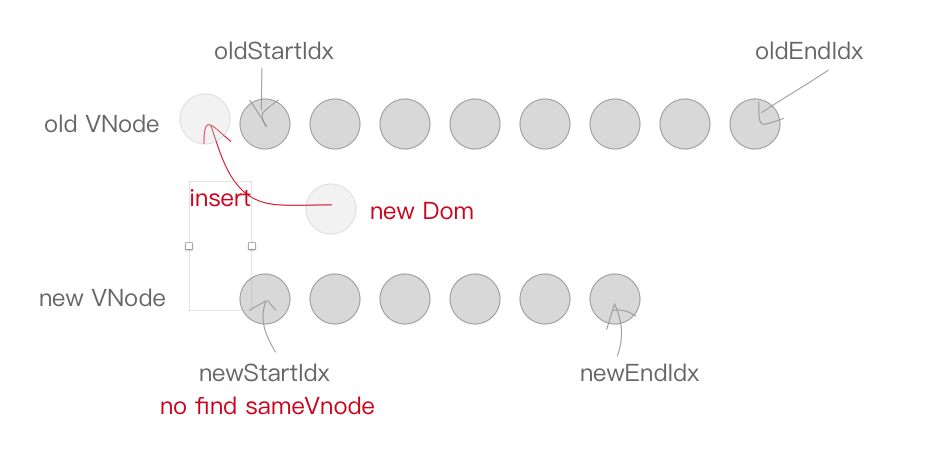
当然也有可能newStartVnode在旧的VNode节点找不到一致的key,或者是即便key相同却不是sameVnode,这个时候会调用createElm创建一个新的DOM节点。
到这里循环已经结束了,那么剩下我们还需要处理多余或者不够的真实DOM节点。
1.当结束时oldStartIdx > oldEndIdx,这个时候老的VNode节点已经遍历完了,但是新的节点还没有。说明了新的VNode节点实际上比老的VNode节点多,也就是比真实DOM多,需要将剩下的(也就是新增的)VNode节点插入到真实DOM节点中去,此时调用addVnodes(批量调用createElm的接口将这些节点加入到真实DOM中去)。
2。同理,当newStartIdx > newEndIdx时,新的VNode节点已经遍历完了,但是老的节点还有剩余,说明真实DOM节点多余了,需要从文档中删除,这时候调用removeVnodes将这些多余的真实DOM删除。
# DOM操作
由于Vue使用了虚拟DOM,所以虚拟DOM可以在任何支持JavaScript语言的平台上操作,譬如说目前Vue支持的浏览器平台或是weex,在虚拟DOM的实现上是一致的。那么最后虚拟DOM如何映射到真实的DOM节点上呢?
Vue为平台做了一层适配层,浏览器平台见/platforms/web/runtime/node-ops.js以及weex平台见/platforms/weex/runtime/node-ops.js。不同平台之间通过适配层对外提供相同的接口,虚拟DOM进行操作真实DOM节点的时候,只需要调用这些适配层的接口即可,而内部实现则不需要关心,它会根据平台的改变而改变。
现在又出现了一个问题,我们只是将虚拟DOM映射成了真实的DOM。那如何给这些DOM加入attr、class、style等DOM属性呢?
这要依赖于虚拟DOM的生命钩子。虚拟DOM提供了如下的钩子函数,分别在不同的时期会进行调用。
const hooks = ['create', 'activate', 'update', 'remove', 'destroy']

/*构建cbs回调函数,web平台上见/platforms/web/runtime/modules*/
  for (i = 0; i < hooks.length; ++i) {
    cbs[hooks[i]] = []
    for (j = 0; j < modules.length; ++j) {
      if (isDef(modules[j][hooks[i]])) {
        cbs[hooks[i]].push(modules[j][hooks[i]])
      }
    }
  }
2
3
4
5
6
7
8
9
10
11
同理,也会根据不同平台有自己不同的实现,我们这里以Web平台为例。Web平台的钩子函数见/platforms/web/runtime/modules。里面有对attr、class、props、events、style以及transition(过渡状态)的DOM属性进行操作。
以attr为例,代码很简单。
/* @flow */

import { isIE9 } from 'core/util/env'

import {
  extend,
  isDef,
  isUndef
} from 'shared/util'

import {
  isXlink,
  xlinkNS,
  getXlinkProp,
  isBooleanAttr,
  isEnumeratedAttr,
  isFalsyAttrValue
} from 'web/util/index'

/*更新attr*/
function updateAttrs (oldVnode: VNodeWithData, vnode: VNodeWithData) {
  /*如果旧的以及新的VNode节点均没有attr属性,则直接返回*/
  if (isUndef(oldVnode.data.attrs) && isUndef(vnode.data.attrs)) {
    return
  }
  let key, cur, old
  /*VNode节点对应的Dom实例*/
  const elm = vnode.elm
  /*旧VNode节点的attr*/
  const oldAttrs = oldVnode.data.attrs || {}
  /*新VNode节点的attr*/
  let attrs: any = vnode.data.attrs || {}
  // clone observed objects, as the user probably wants to mutate it
  /*如果新的VNode的attr已经有__ob__(代表已经被Observe处理过了), 进行深拷贝*/
  if (isDef(attrs.__ob__)) {
    attrs = vnode.data.attrs = extend({}, attrs)
  }

  /*遍历attr,不一致则替换*/
  for (key in attrs) {
    cur = attrs[key]
    old = oldAttrs[key]
    if (old !== cur) {
      setAttr(elm, key, cur)
    }
  }
  // #4391: in IE9, setting type can reset value for input[type=radio]
  /* istanbul ignore if */
  if (isIE9 && attrs.value !== oldAttrs.value) {
    setAttr(elm, 'value', attrs.value)
  }
  for (key in oldAttrs) {
    if (isUndef(attrs[key])) {
      if (isXlink(key)) {
        elm.removeAttributeNS(xlinkNS, getXlinkProp(key))
      } else if (!isEnumeratedAttr(key)) {
        elm.removeAttribute(key)
      }
    }
  }
}

/*设置attr*/
function setAttr (el: Element, key: string, value: any) {
  if (isBooleanAttr(key)) {
    // set attribute for blank value
    // e.g. <option disabled>Select one</option>
    if (isFalsyAttrValue(value)) {
      el.removeAttribute(key)
    } else {
      el.setAttribute(key, key)
    }
  } else if (isEnumeratedAttr(key)) {
    el.setAttribute(key, isFalsyAttrValue(value) || value === 'false' ? 'false' : 'true')
  } else if (isXlink(key)) {
    if (isFalsyAttrValue(value)) {
      el.removeAttributeNS(xlinkNS, getXlinkProp(key))
    } else {
      el.setAttributeNS(xlinkNS, key, value)
    }
  } else {
    if (isFalsyAttrValue(value)) {
      el.removeAttribute(key)
    } else {
      el.setAttribute(key, value)
    }
  }
}

export default {
  create: updateAttrs,
  update: updateAttrs
}
2
3
4
5
6
7
8
9
10
11
12
13
14
15
16
17
18
19
20
21
22
23
24
25
26
27
28
29
30
31
32
33
34
35
36
37
38
39
40
41
42
43
44
45
46
47
48
49
50
51
52
53
54
55
56
57
58
59
60
61
62
63
64
65
66
67
68
69
70
71
72
73
74
75
76
77
78
79
80
81
82
83
84
85
86
87
88
89
90
91
92
93
94
attr只需要在create以及update钩子被调用时更新DOM的attr属性即可。
# 七、聊聊Vue的template编译
# $mount
首先看一下mount的代码
/*把原本不带编译的$mount方法保存下来,在最后会调用。*/
const mount = Vue.prototype.$mount
/*挂载组件,带模板编译*/
Vue.prototype.$mount = function (
  el?: string | Element,
  hydrating?: boolean
): Component {
  el = el && query(el)

  /* istanbul ignore if */
  if (el === document.body || el === document.documentElement) {
    process.env.NODE_ENV !== 'production' && warn(
      `Do not mount Vue to <html> or <body> - mount to normal elements instead.`
    )
    return this
  }

  const options = this.$options
  // resolve template/el and convert to render function
  /*处理模板templete,编译成render函数,render不存在的时候才会编译template,否则优先使用render*/
  if (!options.render) {
    let template = options.template
    /*template存在的时候取template,不存在的时候取el的outerHTML*/
    if (template) {
      /*当template是字符串的时候*/
      if (typeof template === 'string') {
        if (template.charAt(0) === '#') {
          template = idToTemplate(template)
          /* istanbul ignore if */
          if (process.env.NODE_ENV !== 'production' && !template) {
            warn(
              `Template element not found or is empty: ${options.template}`,
              this
            )
          }
        }
      } else if (template.nodeType) {
        /*当template为DOM节点的时候*/
        template = template.innerHTML
      } else {
        /*报错*/
        if (process.env.NODE_ENV !== 'production') {
          warn('invalid template option:' + template, this)
        }
        return this
      }
    } else if (el) {
      /*获取element的outerHTML*/
      template = getOuterHTML(el)
    }
    if (template) {
      /* istanbul ignore if */
      if (process.env.NODE_ENV !== 'production' && config.performance && mark) {
        mark('compile')
      }

      /*将template编译成render函数,这里会有render以及staticRenderFns两个返回,这是vue的编译时优化,static静态不需要在VNode更新时进行patch,优化性能*/
      const { render, staticRenderFns } = compileToFunctions(template, {
        shouldDecodeNewlines,
        delimiters: options.delimiters
      }, this)
      options.render = render
      options.staticRenderFns = staticRenderFns

      /* istanbul ignore if */
      if (process.env.NODE_ENV !== 'production' && config.performance && mark) {
        mark('compile end')
        measure(`${this._name} compile`, 'compile', 'compile end')
      }
    }
  }
  /*调用const mount = Vue.prototype.$mount保存下来的不带编译的mount*/
  return mount.call(this, el, hydrating)
}
2
3
4
5
6
7
8
9
10
11
12
13
14
15
16
17
18
19
20
21
22
23
24
25
26
27
28
29
30
31
32
33
34
35
36
37
38
39
40
41
42
43
44
45
46
47
48
49
50
51
52
53
54
55
56
57
58
59
60
61
62
63
64
65
66
67
68
69
70
71
72
73
74
通过mount代码我们可以看到,在mount的过程中,如果render函数不存在(render函数存在会优先使用render)会将template进行compileToFunctions得到render以及staticRenderFns。譬如说手写组件时加入了template的情况都会在运行时进行编译。而render function在运行后会返回VNode节点,供页面的渲染以及在update的时候patch。接下来我们来看一下template是如何编译的。
# 一些基础
首先,template会被编译成AST,那么AST是什么?
在计算机科学中,抽象语法树(abstract syntax tree或者缩写为AST),或者语法树(syntax tree),是源代码的抽象语法结构的树状表现形式,这里特指编程语言的源代码。具体可以查看抽象语法树。
AST会经过generate得到render函数,render的返回值是VNode,VNode是Vue的虚拟DOM节点。
# createCompiler
createCompiler用以创建编译器,返回值是compile以及compileToFunctions。compile是一个编译器,它会将传入的template转换成对应的AST、render函数以及staticRenderFns函数。而compileToFunctions则是带缓存的编译器,同时staticRenderFns以及render函数会被转换成Funtion对象。
因为不同平台有一些不同的options,所以createCompiler会根据平台区分传入一个baseOptions,会与compile本身传入的options合并得到最终的finalOptions。
# compileToFunctions
首先还是贴一下compileToFunctions的代码。
  /*带缓存的编译器,同时staticRenderFns以及render函数会被转换成Funtion对象*/
  function compileToFunctions (
    template: string,
    options?: CompilerOptions,
    vm?: Component
  ): CompiledFunctionResult {
    options = options || {}

    /* istanbul ignore if */
    if (process.env.NODE_ENV !== 'production') {
      // detect possible CSP restriction
      try {
        new Function('return 1')
      } catch (e) {
        if (e.toString().match(/unsafe-eval|CSP/)) {
          warn(
            'It seems you are using the standalone build of Vue.js in an ' +
            'environment with Content Security Policy that prohibits unsafe-eval. ' +
            'The template compiler cannot work in this environment. Consider ' +
            'relaxing the policy to allow unsafe-eval or pre-compiling your ' +
            'templates into render functions.'
          )
        }
      }
    }
    // check cache
    /*有缓存的时候直接取出缓存中的结果即可*/
    const key = options.delimiters
      ? String(options.delimiters) + template
      : template
    if (functionCompileCache[key]) {
      return functionCompileCache[key]
    }

    // compile
    /*编译*/
    const compiled = compile(template, options)

    // check compilation errors/tips
    if (process.env.NODE_ENV !== 'production') {
      if (compiled.errors && compiled.errors.length) {
        warn(
          `Error compiling template:\n\n${template}\n\n` +
          compiled.errors.map(e => `- ${e}`).join('\n') + '\n',
          vm
        )
      }
      if (compiled.tips && compiled.tips.length) {
        compiled.tips.forEach(msg => tip(msg, vm))
      }
    }

    // turn code into functions
    const res = {}
    const fnGenErrors = []
    /*将render转换成Funtion对象*/
    res.render = makeFunction(compiled.render, fnGenErrors)
    /*将staticRenderFns全部转化成Funtion对象 */
    const l = compiled.staticRenderFns.length
    res.staticRenderFns = new Array(l)
    for (let i = 0; i < l; i++) {
      res.staticRenderFns[i] = makeFunction(compiled.staticRenderFns[i], fnGenErrors)
    }

    // check function generation errors.
    // this should only happen if there is a bug in the compiler itself.
    // mostly for codegen development use
    /* istanbul ignore if */
    if (process.env.NODE_ENV !== 'production') {
      if ((!compiled.errors || !compiled.errors.length) && fnGenErrors.length) {
        warn(
          `Failed to generate render function:\n\n` +
          fnGenErrors.map(({ err, code }) => `${err.toString()} in\n\n${code}\n`).join('\n'),
          vm
        )
      }
    }

    /*存放在缓存中,以免每次都重新编译*/
    return (functionCompileCache[key] = res)
  }
2
3
4
5
6
7
8
9
10
11
12
13
14
15
16
17
18
19
20
21
22
23
24
25
26
27
28
29
30
31
32
33
34
35
36
37
38
39
40
41
42
43
44
45
46
47
48
49
50
51
52
53
54
55
56
57
58
59
60
61
62
63
64
65
66
67
68
69
70
71
72
73
74
75
76
77
78
79
80
81
我们可以发现,在闭包中,会有一个functionCompileCache对象作为缓存器。
  /*作为缓存,防止每次都重新编译*/
  const functionCompileCache: {
    [key: string]: CompiledFunctionResult;
  } = Object.create(null)
2
3
4
在进入compileToFunctions以后,会先检查缓存中是否有已经编译好的结果,如果有结果则直接从缓存中读取。这样做防止每次同样的模板都要进行重复的编译工作。
    // check cache
    /*有缓存的时候直接取出缓存中的结果即可*/
    const key = options.delimiters
      ? String(options.delimiters) + template
      : template
    if (functionCompileCache[key]) {
      return functionCompileCache[key]
    }
2
3
4
5
6
7
8
在compileToFunctions的末尾会将编译结果进行缓存
  /*存放在缓存中,以免每次都重新编译*/
  return (functionCompileCache[key] = res)
2
# compile
  /*编译,将模板template编译成AST、render函数以及staticRenderFns函数*/
  function compile (
    template: string,
    options?: CompilerOptions
  ): CompiledResult {
    const finalOptions = Object.create(baseOptions)
    const errors = []
    const tips = []
    finalOptions.warn = (msg, tip) => {
      (tip ? tips : errors).push(msg)
    }

    /*做下面这些merge的目的因为不同平台可以提供自己本身平台的一个baseOptions,内部封装了平台自己的实现,然后把共同的部分抽离开来放在这层compiler中,所以在这里需要merge一下*/
    if (options) {
      // merge custom modules
      /*合并modules*/
      if (options.modules) {
        finalOptions.modules = (baseOptions.modules || []).concat(options.modules)
      }
      // merge custom directives
      if (options.directives) {
        /*合并directives*/
        finalOptions.directives = extend(
          Object.create(baseOptions.directives),
          options.directives
        )
      }
      // copy other options
      for (const key in options) {
        /*合并其余的options,modules与directives已经在上面做了特殊处理了*/
        if (key !== 'modules' && key !== 'directives') {
          finalOptions[key] = options[key]
        }
      }
    }

    /*基础模板编译,得到编译结果*/
    const compiled = baseCompile(template, finalOptions)
    if (process.env.NODE_ENV !== 'production') {
      errors.push.apply(errors, detectErrors(compiled.ast))
    }
    compiled.errors = errors
    compiled.tips = tips
    return compiled
  }
2
3
4
5
6
7
8
9
10
11
12
13
14
15
16
17
18
19
20
21
22
23
24
25
26
27
28
29
30
31
32
33
34
35
36
37
38
39
40
41
42
43
44
45
compile主要做了两件事,一件是合并option(前面说的将平台自有的option与传入的option进行合并),另一件是baseCompile,进行模板template的编译。
来看一下baseCompile
# baseCompile
function baseCompile (
  template: string,
  options: CompilerOptions
): CompiledResult {
  /*parse解析得到AST*/
  const ast = parse(template.trim(), options)
  /*
    将AST进行优化
    优化的目标:生成模板AST,检测不需要进行DOM改变的静态子树。
    一旦检测到这些静态树,我们就能做以下这些事情:
    1.把它们变成常数,这样我们就再也不需要每次重新渲染时创建新的节点了。
    2.在patch的过程中直接跳过。
 */
  optimize(ast, options)
  /*根据AST生成所需的code(内部包含render与staticRenderFns)*/
  const code = generate(ast, options)
  return {
    ast,
    render: code.render,
    staticRenderFns: code.staticRenderFns
  }
}
2
3
4
5
6
7
8
9
10
11
12
13
14
15
16
17
18
19
20
21
22
baseCompile首先会将模板template进行parse得到一个AST,再通过optimize做一些优化,最后通过generate得到render以及staticRenderFns。
# parse
parse的源码可以参见https://github.com/answershuto/learnVue/blob/master/vue-src/compiler/parser/index.js#L53。
parse会用正则等方式解析template模板中的指令、class、style等数据,形成AST。
# optimize
optimize的主要作用是标记static静态节点,这是Vue在编译过程中的一处优化,后面当update更新界面时,会有一个patch的过程,diff算法会直接跳过静态节点,从而减少了比较的过程,优化了patch的性能。
# generate
generate是将AST转化成render funtion字符串的过程,得到结果是render的字符串以及staticRenderFns字符串。
至此,我们的template模板已经被转化成了我们所需的AST、render function字符串以及staticRenderFns字符串。
# 举个例子
来看一下这段代码的编译结果
<div class="main" :class="bindClass">
    <div>{{text}}</div>
    <div>hello world</div>
    <div v-for="(item, index) in arr">
        <p>{{item.name}}</p>
        <p>{{item.value}}</p>
        <p>{{index}}</p>
        <p>---</p>
    </div>
    <div v-if="text">
        {{text}}
    </div>
    <div v-else></div>
</div>
2
3
4
5
6
7
8
9
10
11
12
13
14
转化后得到AST,如下图:
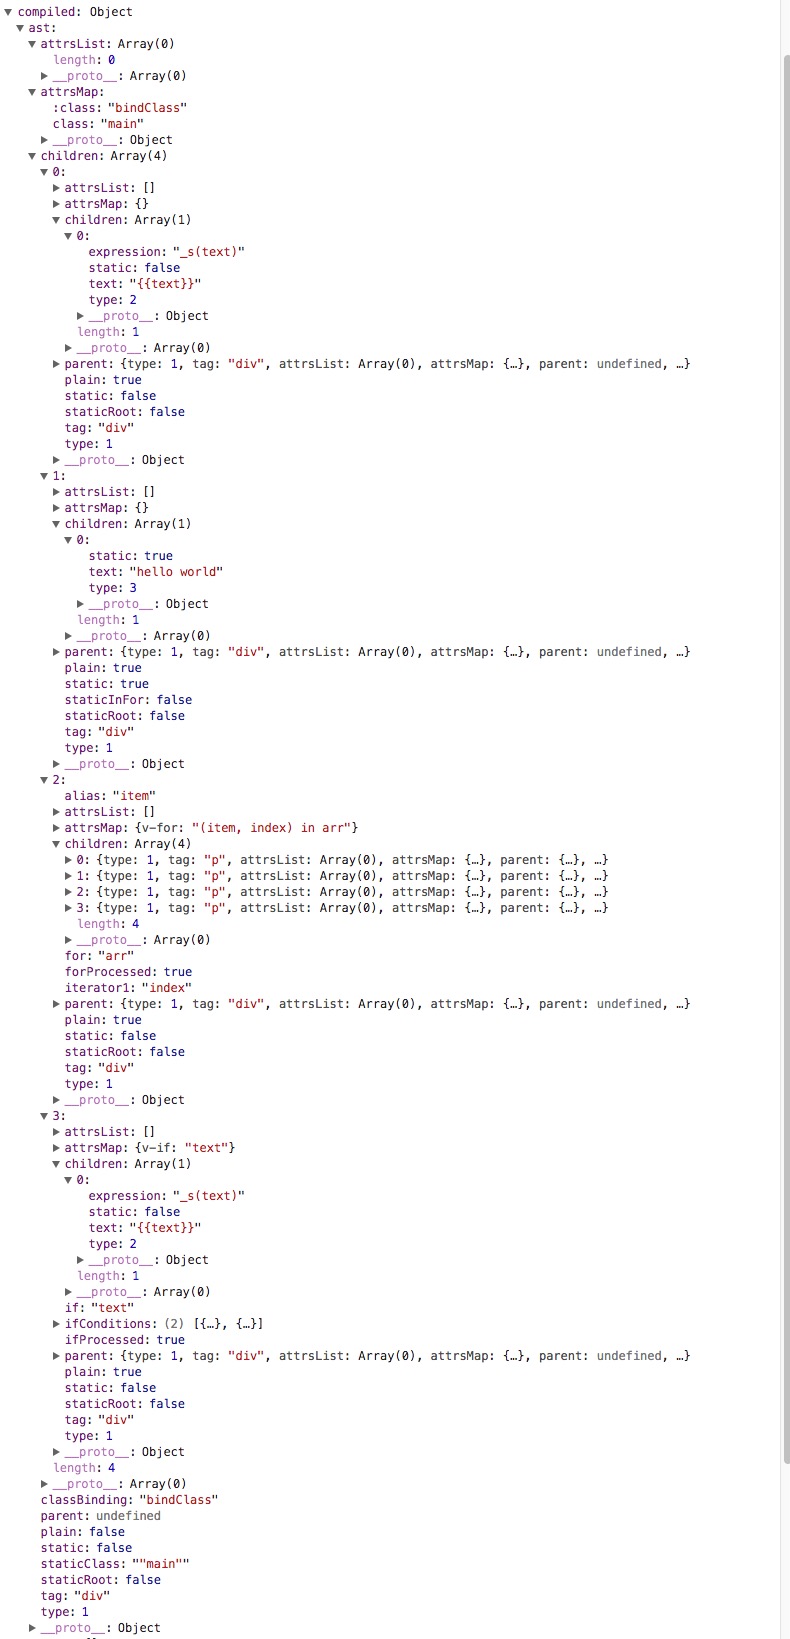
我们可以看到最外层的div是这颗AST的根节点,节点上有许多数据代表这个节点的形态,比如static表示是否是静态节点,staticClass表示静态class属性(非bind:class)。children代表该节点的子节点,可以看到children是一个长度为4的数组,里面包含的是该节点下的四个div子节点。children里面的节点与父节点的结构类似,层层往下形成一棵AST。
再来看看由AST得到的render函数
with (this) {
  return _c(
    "div",
    {
      /*static class*/
      staticClass: "main",
      /*bind class*/
      class: bindClass
    },
    [
      _c("div", [_v(_s(text))]),
      _c("div", [_v("hello world")]),
      /*这是一个v-for循环*/
      _l(arr, function(item, index) {
        return _c("div", [
          _c("p", [_v(_s(item.name))]),
          _c("p", [_v(_s(item.value))]),
          _c("p", [_v(_s(index))]),
          _c("p", [_v("---")])
        ]);
      }),
      /*这是v-if*/
      text ? _c("div", [_v(_s(text))]) : _c("div", [_v("no text")])
    ],
    2
  );
}
2
3
4
5
6
7
8
9
10
11
12
13
14
15
16
17
18
19
20
21
22
23
24
25
26
27
# _c,_v,_s,_q
看了render function字符串,发现有大量的_c,_v,_s,_q,这些函数究竟是什么?
带着问题,我们来看一下core/instance/render。
/*处理v-once的渲染函数*/
  Vue.prototype._o = markOnce
  /*将字符串转化为数字,如果转换失败会返回原字符串*/
  Vue.prototype._n = toNumber
  /*将val转化成字符串*/
  Vue.prototype._s = toString
  /*处理v-for列表渲染*/
  Vue.prototype._l = renderList
  /*处理slot的渲染*/
  Vue.prototype._t = renderSlot
  /*检测两个变量是否相等*/
  Vue.prototype._q = looseEqual
  /*检测arr数组中是否包含与val变量相等的项*/
  Vue.prototype._i = looseIndexOf
  /*处理static树的渲染*/
  Vue.prototype._m = renderStatic
  /*处理filters*/
  Vue.prototype._f = resolveFilter
  /*从config配置中检查eventKeyCode是否存在*/
  Vue.prototype._k = checkKeyCodes
  /*合并v-bind指令到VNode中*/
  Vue.prototype._b = bindObjectProps
  /*创建一个文本节点*/
  Vue.prototype._v = createTextVNode
  /*创建一个空VNode节点*/
  Vue.prototype._e = createEmptyVNode
  /*处理ScopedSlots*/
  Vue.prototype._u = resolveScopedSlots

  /*创建VNode节点*/
  vm._c = (a, b, c, d) => createElement(vm, a, b, c, d, false)
2
3
4
5
6
7
8
9
10
11
12
13
14
15
16
17
18
19
20
21
22
23
24
25
26
27
28
29
30
31
通过这些函数,render函数最后会返回一个VNode节点,在_update的时候,经过patch与之前的VNode节点进行比较,得出差异后将这些差异渲染到真实的DOM上。
# 八、异步更新DOM策略及nextTick
# 操作DOM
在使用vue.js的时候,有时候因为一些特定的业务场景,不得不去操作DOM,比如这样:
<template>
  <div>
    <div ref="test">{{test}}</div>
    <button @click="handleClick">tet</button>
  </div>
</template>
2
3
4
5
6
7
export default {
    data () {
        return {
            test: 'begin'
        };
    },
    methods () {
        handleClick () {
            this.test = 'end';
            console.log(this.$refs.test.innerText);//打印“begin”
        }
    }
}
2
3
4
5
6
7
8
9
10
11
12
13
打印的结果是begin,为什么我们明明已经将test设置成了“end”,获取真实DOM节点的innerText却没有得到我们预期中的“end”,而是得到之前的值“begin”呢?
# Watcher队列
带着疑问,我们找到了Vue.js源码的Watch实现。当某个响应式数据发生变化的时候,它的setter函数会通知闭包中的Dep,Dep则会调用它管理的所有Watch对象。触发Watch对象的update实现。我们来看一下update的实现。
update () {
    /* istanbul ignore else */
    if (this.lazy) {
        this.dirty = true
    } else if (this.sync) {
        /*同步则执行run直接渲染视图*/
        this.run()
    } else {
        /*异步推送到观察者队列中,下一个tick时调用。*/
        queueWatcher(this)
    }
}
2
3
4
5
6
7
8
9
10
11
12
我们发现Vue.js默认是使用异步执行DOM更新。 当异步执行update的时候,会调用queueWatcher函数。
 /*将一个观察者对象push进观察者队列,在队列中已经存在相同的id则该观察者对象将被跳过,除非它是在队列被刷新时推送*/
export function queueWatcher (watcher: Watcher) {
  /*获取watcher的id*/
  const id = watcher.id
  /*检验id是否存在,已经存在则直接跳过,不存在则标记哈希表has,用于下次检验*/
  if (has[id] == null) {
    has[id] = true
    if (!flushing) {
      /*如果没有flush掉,直接push到队列中即可*/
      queue.push(watcher)
    } else {
      // if already flushing, splice the watcher based on its id
      // if already past its id, it will be run next immediately.
      let i = queue.length - 1
      while (i >= 0 && queue[i].id > watcher.id) {
        i--
      }
      queue.splice(Math.max(i, index) + 1, 0, watcher)
    }
    // queue the flush
    if (!waiting) {
      waiting = true
      nextTick(flushSchedulerQueue)
    }
  }
}
2
3
4
5
6
7
8
9
10
11
12
13
14
15
16
17
18
19
20
21
22
23
24
25
26
查看queueWatcher的源码我们发现,Watch对象并不是立即更新视图,而是被push进了一个队列queue,此时状态处于waiting的状态,这时候会继续会有Watch对象被push进这个队列queue,等到下一个tick运行时,这些Watch对象才会被遍历取出,更新视图。同时,id重复的Watcher不会被多次加入到queue中去,因为在最终渲染时,我们只需要关心数据的最终结果。
那么,什么是下一个tick?
# nextTick
vue.js提供了一个nextTick函数,其实也就是上面调用的nextTick。
nextTick的实现比较简单,执行的目的是在microtask或者task中推入一个function,在当前栈执行完毕(也许还会有一些排在前面的需要执行的任务)以后执行nextTick传入的function,看一下源码:
/**
 * Defer a task to execute it asynchronously.
 */
 /*
    延迟一个任务使其异步执行,在下一个tick时执行,一个立即执行函数,返回一个function
    这个函数的作用是在task或者microtask中推入一个timerFunc,在当前调用栈执行完以后以此执行直到执行到timerFunc
    目的是延迟到当前调用栈执行完以后执行
*/
export const nextTick = (function () {
  /*存放异步执行的回调*/
  const callbacks = []
  /*一个标记位,如果已经有timerFunc被推送到任务队列中去则不需要重复推送*/
  let pending = false
  /*一个函数指针,指向函数将被推送到任务队列中,等到主线程任务执行完时,任务队列中的timerFunc被调用*/
  let timerFunc

  /*下一个tick时的回调*/
  function nextTickHandler () {
    /*一个标记位,标记等待状态(即函数已经被推入任务队列或者主线程,已经在等待当前栈执行完毕去执行),这样就不需要在push多个回调到callbacks时将timerFunc多次推入任务队列或者主线程*/
    pending = false
    /*执行所有callback*/
    const copies = callbacks.slice(0)
    callbacks.length = 0
    for (let i = 0; i < copies.length; i++) {
      copies[i]()
    }
  }

  // the nextTick behavior leverages the microtask queue, which can be accessed
  // via either native Promise.then or MutationObserver.
  // MutationObserver has wider support, however it is seriously bugged in
  // UIWebView in iOS >= 9.3.3 when triggered in touch event handlers. It
  // completely stops working after triggering a few times... so, if native
  // Promise is available, we will use it:
  /* istanbul ignore if */

  /*
    这里解释一下,一共有Promise、MutationObserver以及setTimeout三种尝试得到timerFunc的方法
    优先使用Promise,在Promise不存在的情况下使用MutationObserver,这两个方法都会在microtask中执行,会比setTimeout更早执行,所以优先使用。
    如果上述两种方法都不支持的环境则会使用setTimeout,在task尾部推入这个函数,等待调用执行。
    参考:https://www.zhihu.com/question/55364497
  */
  if (typeof Promise !== 'undefined' && isNative(Promise)) {
    /*使用Promise*/
    var p = Promise.resolve()
    var logError = err => { console.error(err) }
    timerFunc = () => {
      p.then(nextTickHandler).catch(logError)
      // in problematic UIWebViews, Promise.then doesn't completely break, but
      // it can get stuck in a weird state where callbacks are pushed into the
      // microtask queue but the queue isn't being flushed, until the browser
      // needs to do some other work, e.g. handle a timer. Therefore we can
      // "force" the microtask queue to be flushed by adding an empty timer.
      if (isIOS) setTimeout(noop)
    }
  } else if (typeof MutationObserver !== 'undefined' && (
    isNative(MutationObserver) ||
    // PhantomJS and iOS 7.x
    MutationObserver.toString() === '[object MutationObserverConstructor]'
  )) {
    // use MutationObserver where native Promise is not available,
    // e.g. PhantomJS IE11, iOS7, Android 4.4
    /*新建一个textNode的DOM对象,用MutationObserver绑定该DOM并指定回调函数,在DOM变化的时候则会触发回调,该回调会进入主线程(比任务队列优先执行),即textNode.data = String(counter)时便会触发回调*/
    var counter = 1
    var observer = new MutationObserver(nextTickHandler)
    var textNode = document.createTextNode(String(counter))
    observer.observe(textNode, {
      characterData: true
    })
    timerFunc = () => {
      counter = (counter + 1) % 2
      textNode.data = String(counter)
    }
  } else {
    // fallback to setTimeout
    /* istanbul ignore next */
    /*使用setTimeout将回调推入任务队列尾部*/
    timerFunc = () => {
      setTimeout(nextTickHandler, 0)
    }
  }

  /*
    推送到队列中下一个tick时执行
    cb 回调函数
    ctx 上下文
  */
  return function queueNextTick (cb?: Function, ctx?: Object) {
    let _resolve
    /*cb存到callbacks中*/
    callbacks.push(() => {
      if (cb) {
        try {
          cb.call(ctx)
        } catch (e) {
          handleError(e, ctx, 'nextTick')
        }
      } else if (_resolve) {
        _resolve(ctx)
      }
    })
    if (!pending) {
      pending = true
      timerFunc()
    }
    if (!cb && typeof Promise !== 'undefined') {
      return new Promise((resolve, reject) => {
        _resolve = resolve
      })
    }
  }
})()
2
3
4
5
6
7
8
9
10
11
12
13
14
15
16
17
18
19
20
21
22
23
24
25
26
27
28
29
30
31
32
33
34
35
36
37
38
39
40
41
42
43
44
45
46
47
48
49
50
51
52
53
54
55
56
57
58
59
60
61
62
63
64
65
66
67
68
69
70
71
72
73
74
75
76
77
78
79
80
81
82
83
84
85
86
87
88
89
90
91
92
93
94
95
96
97
98
99
100
101
102
103
104
105
106
107
108
109
110
111
112
它是一个立即执行函数,返回一个queueNextTick接口。
传入的cb会被push进callbacks中存放起来,然后执行timerFunc(pending是一个状态标记,保证timerFunc在下一个tick之前只执行一次)。
timerFunc是什么?
看了源码发现timerFunc会检测当前环境而不同实现,其实就是按照Promise,MutationObserver,setTimeout优先级,哪个存在使用哪个,最不济的环境下使用setTimeout。
这里解释一下,一共有Promise、MutationObserver以及setTimeout三种尝试得到timerFunc的方法。 优先使用Promise,在Promise不存在的情况下使用MutationObserver,这两个方法的回调函数都会在microtask中执行,它们会比setTimeout更早执行,所以优先使用。 如果上述两种方法都不支持的环境则会使用setTimeout,在task尾部推入这个函数,等待调用执行。
为什么要优先使用microtask?我在顾轶灵在知乎的回答中学习到:
JS 的 event loop 执行时会区分 task 和 microtask,引擎在每个 task 执行完毕,从队列中取下一个 task 来执行之前,会先执行完所有 microtask 队列中的 microtask。
setTimeout 回调会被分配到一个新的 task 中执行,而 Promise 的 resolver、MutationObserver 的回调都会被安排到一个新的 microtask 中执行,会比 setTimeout 产生的 task 先执行。
要创建一个新的 microtask,优先使用 Promise,如果浏览器不支持,再尝试 MutationObserver。
实在不行,只能用 setTimeout 创建 task 了。
为啥要用 microtask?
根据 HTML Standard,在每个 task 运行完以后,UI 都会重渲染,那么在 microtask 中就完成数据更新,当前 task 结束就可以得到最新的 UI 了。
反之如果新建一个 task 来做数据更新,那么渲染就会进行两次。

参考顾轶灵知乎的回答:https://www.zhihu.com/question/55364497/answer/144215284
2
3
4
5
6
7
8
9
首先是Promise,Promise.resolve().then()可以在microtask中加入它的回调,
MutationObserver新建一个textNode的DOM对象,用MutationObserver绑定该DOM并指定回调函数,在DOM变化的时候则会触发回调,该回调会进入microtask,即textNode.data = String(counter)时便会加入该回调。
setTimeout是最后的一种备选方案,它会将回调函数加入task中,等到执行。
综上,nextTick的目的就是产生一个回调函数加入task或者microtask中,当前栈执行完以后(可能中间还有别的排在前面的函数)调用该回调函数,起到了异步触发(即下一个tick时触发)的目的。
# flushSchedulerQueue
/**
 * Flush both queues and run the watchers.
 */
 /*nextTick的回调函数,在下一个tick时flush掉两个队列同时运行watchers*/
function flushSchedulerQueue () {
  flushing = true
  let watcher, id

  // Sort queue before flush.
  // This ensures that:
  // 1. Components are updated from parent to child. (because parent is always
  //    created before the child)
  // 2. A component's user watchers are run before its render watcher (because
  //    user watchers are created before the render watcher)
  // 3. If a component is destroyed during a parent component's watcher run,
  //    its watchers can be skipped.
  /*
    给queue排序,这样做可以保证:
    1.组件更新的顺序是从父组件到子组件的顺序,因为父组件总是比子组件先创建。
    2.一个组件的user watchers比render watcher先运行,因为user watchers往往比render watcher更早创建
    3.如果一个组件在父组件watcher运行期间被销毁,它的watcher执行将被跳过。
  */
  queue.sort((a, b) => a.id - b.id)

  // do not cache length because more watchers might be pushed
  // as we run existing watchers
  /*这里不用index = queue.length;index > 0; index--的方式写是因为不要将length进行缓存,因为在执行处理现有watcher对象期间,更多的watcher对象可能会被push进queue*/
  for (index = 0; index < queue.length; index++) {
    watcher = queue[index]
    id = watcher.id
    /*将has的标记删除*/
    has[id] = null
    /*执行watcher*/
    watcher.run()
    // in dev build, check and stop circular updates.
    /*
      在测试环境中,检测watch是否在死循环中
      比如这样一种情况
      watch: {
        test () {
          this.test++;
        }
      }
      持续执行了一百次watch代表可能存在死循环
    */
    if (process.env.NODE_ENV !== 'production' && has[id] != null) {
      circular[id] = (circular[id] || 0) + 1
      if (circular[id] > MAX_UPDATE_COUNT) {
        warn(
          'You may have an infinite update loop ' + (
            watcher.user
              ? `in watcher with expression "${watcher.expression}"`
              : `in a component render function.`
          ),
          watcher.vm
        )
        break
      }
    }
  }

  // keep copies of post queues before resetting state
  /**/
  /*得到队列的拷贝*/
  const activatedQueue = activatedChildren.slice()
  const updatedQueue = queue.slice()

  /*重置调度者的状态*/
  resetSchedulerState()

  // call component updated and activated hooks
  /*使子组件状态都改编成active同时调用activated钩子*/
  callActivatedHooks(activatedQueue)
  /*调用updated钩子*/
  callUpdateHooks(updatedQueue)

  // devtool hook
  /* istanbul ignore if */
  if (devtools && config.devtools) {
    devtools.emit('flush')
  }
}
2
3
4
5
6
7
8
9
10
11
12
13
14
15
16
17
18
19
20
21
22
23
24
25
26
27
28
29
30
31
32
33
34
35
36
37
38
39
40
41
42
43
44
45
46
47
48
49
50
51
52
53
54
55
56
57
58
59
60
61
62
63
64
65
66
67
68
69
70
71
72
73
74
75
76
77
78
79
80
81
82
flushSchedulerQueue是下一个tick时的回调函数,主要目的是执行Watcher的run函数,用来更新视图
# 为什么要异步更新视图
来看一下下面这一段代码
<template>
  <div>
    <div>{{test}}</div>
  </div>
</template>
2
3
4
5
6
export default {
    data () {
        return {
            test: 0
        };
    },
    mounted () {
      for(let i = 0; i < 1000; i++) {
        this.test++;
      }
    }
}
2
3
4
5
6
7
8
9
10
11
12
现在有这样的一种情况,mounted的时候test的值会被++循环执行1000次。 每次++时,都会根据响应式触发setter->Dep->Watcher->update->patch。 如果这时候没有异步更新视图,那么每次++都会直接操作DOM更新视图,这是非常消耗性能的。 所以Vue.js实现了一个queue队列,在下一个tick的时候会统一执行queue中Watcher的run。同时,拥有相同id的Watcher不会被重复加入到该queue中去,所以不会执行1000次Watcher的run。最终更新视图只会直接将test对应的DOM的0变成1000。 保证更新视图操作DOM的动作是在当前栈执行完以后下一个tick的时候调用,大大优化了性能。
# 访问真实DOM节点更新后的数据
所以我们需要在修改data中的数据后访问真实的DOM节点更新后的数据,只需要这样,我们把文章第一个例子进行修改。
<template>
  <div>
    <div ref="test">{{test}}</div>
    <button @click="handleClick">tet</button>
  </div>
</template>
2
3
4
5
6
7
export default {
    data () {
        return {
            test: 'begin'
        };
    },
    methods () {
        handleClick () {
            this.test = 'end';
            this.$nextTick(() => {
                console.log(this.$refs.test.innerText);//打印"end"
            });
            console.log(this.$refs.test.innerText);//打印“begin”
        }
    }
}
2
3
4
5
6
7
8
9
10
11
12
13
14
15
16
使用Vue.js的global API的$nextTick方法,即可在回调中获取已经更新好的DOM实例了。
# 九、从template到DOM(Vue.js源码角度看内部运行机制)
# 从new一个Vue对象开始
let vm = new Vue({
    el: '#app',
    /*some options*/
});
2
3
4
很多同学好奇,在new一个Vue对象的时候,内部究竟发生了什么?
究竟Vue.js是如何将data中的数据渲染到真实的宿主环境中的?
又是如何通过“响应式”修改数据的?
template是如何被编译成真实环境中可用的HTML的?
Vue指令又是如何执行的?
带着这些疑问,我们从Vue的构造类开始看起。
# Vue构造类
function Vue (options) {
  if (process.env.NODE_ENV !== 'production' &&
    !(this instanceof Vue)) {
    warn('Vue is a constructor and should be called with the `new` keyword')
  }
  /*初始化*/
  this._init(options)
}
2
3
4
5
6
7
8
Vue的构造类只做了一件事情,就是调用_init函数进行初始化
来看一下init的代码
Vue.prototype._init = function (options?: Object) {
    const vm: Component = this
    // a uid
    vm._uid = uid++

    let startTag, endTag
    /* istanbul ignore if */
    if (process.env.NODE_ENV !== 'production' && config.performance && mark) {
      startTag = `vue-perf-init:${vm._uid}`
      endTag = `vue-perf-end:${vm._uid}`
      mark(startTag)
    }

    // a flag to avoid this being observed
    /*一个防止vm实例自身被观察的标志位*/
    vm._isVue = true
    // merge options
    if (options && options._isComponent) {
      // optimize internal component instantiation
      // since dynamic options merging is pretty slow, and none of the
      // internal component options needs special treatment.
      initInternalComponent(vm, options)
    } else {
      vm.$options = mergeOptions(
        resolveConstructorOptions(vm.constructor),
        options || {},
        vm
      )
    }
    /* istanbul ignore else */
    if (process.env.NODE_ENV !== 'production') {
      initProxy(vm)
    } else {
      vm._renderProxy = vm
    }
    // expose real self
    vm._self = vm
    /*初始化生命周期*/
    initLifecycle(vm)
    /*初始化事件*/
    initEvents(vm)
    /*初始化render*/
    initRender(vm)
    /*调用beforeCreate钩子函数并且触发beforeCreate钩子事件*/
    callHook(vm, 'beforeCreate')
    initInjections(vm) // resolve injections before data/props
    /*初始化props、methods、data、computed与watch*/
    initState(vm)
    initProvide(vm) // resolve provide after data/props
    /*调用created钩子函数并且触发created钩子事件*/
    callHook(vm, 'created')

    /* istanbul ignore if */
    if (process.env.NODE_ENV !== 'production' && config.performance && mark) {
      /*格式化组件名*/
      vm._name = formatComponentName(vm, false)
      mark(endTag)
      measure(`${vm._name} init`, startTag, endTag)
    }

    if (vm.$options.el) {
      /*挂载组件*/
      vm.$mount(vm.$options.el)
    }
  }
2
3
4
5
6
7
8
9
10
11
12
13
14
15
16
17
18
19
20
21
22
23
24
25
26
27
28
29
30
31
32
33
34
35
36
37
38
39
40
41
42
43
44
45
46
47
48
49
50
51
52
53
54
55
56
57
58
59
60
61
62
63
64
65
_init主要做了这两件事:
1.初始化(包括生命周期、事件、render函数、state等)。
2.$mount组件。
在生命钩子beforeCreate与created之间会初始化state,在此过程中,会依次初始化props、methods、data、computed与watch,这也就是Vue.js对options中的数据进行“响应式化”(即双向绑定)的过程。对于Vue.js响应式原理不了解的同学可以先看一下笔者的另一片文章《Vue.js响应式原理》。
/*初始化props、methods、data、computed与watch*/
export function initState (vm: Component) {
  vm._watchers = []
  const opts = vm.$options
  /*初始化props*/
  if (opts.props) initProps(vm, opts.props)
  /*初始化方法*/
  if (opts.methods) initMethods(vm, opts.methods)
  /*初始化data*/
  if (opts.data) {
    initData(vm)
  } else {
    /*该组件没有data的时候绑定一个空对象*/
    observe(vm._data = {}, true /* asRootData */)
  }
  /*初始化computed*/
  if (opts.computed) initComputed(vm, opts.computed)
  /*初始化watchers*/
  if (opts.watch) initWatch(vm, opts.watch)
}
2
3
4
5
6
7
8
9
10
11
12
13
14
15
16
17
18
19
20
21
# 双向绑定
以initData为例,对option的data的数据进行双向绑定Oberver,其他option参数双向绑定的核心原理是一致的。
function initData (vm: Component) {

  /*得到data数据*/
  let data = vm.$options.data
  data = vm._data = typeof data === 'function'
    ? getData(data, vm)
    : data || {}

  /*判断是否是对象*/
  if (!isPlainObject(data)) {
    data = {}
    process.env.NODE_ENV !== 'production' && warn(
      'data functions should return an object:\n' +
      'https://vuejs.org/v2/guide/components.html#data-Must-Be-a-Function',
      vm
    )
  }

  // proxy data on instance
  /*遍历data对象*/
  const keys = Object.keys(data)
  const props = vm.$options.props
  let i = keys.length

  //遍历data中的数据
  while (i--) {
    /*保证data中的key不与props中的key重复,props优先,如果有冲突会产生warning*/
    if (props && hasOwn(props, keys[i])) {
      process.env.NODE_ENV !== 'production' && warn(
        `The data property "${keys[i]}" is already declared as a prop. ` +
        `Use prop default value instead.`,
        vm
      )
    } else if (!isReserved(keys[i])) {
      /*判断是否是保留字段*/

      /*这里是我们前面讲过的代理,将data上面的属性代理到了vm实例上*/
      proxy(vm, `_data`, keys[i])
    }
  }
  // observe data
  /*从这里开始我们要observe了,开始对数据进行绑定,这里有尤大大的注释asRootData,这步作为根数据,下面会进行递归observe进行对深层对象的绑定。*/
  observe(data, true /* asRootData */)
}
2
3
4
5
6
7
8
9
10
11
12
13
14
15
16
17
18
19
20
21
22
23
24
25
26
27
28
29
30
31
32
33
34
35
36
37
38
39
40
41
42
43
44
observe会通过defineReactive对data中的对象进行双向绑定,最终通过Object.defineProperty对对象设置setter以及getter的方法。getter的方法主要用来进行依赖收集,对于依赖收集不了解的同学可以参考笔者的另一篇文章《依赖收集》。setter方法会在对象被修改的时候触发(不存在添加属性的情况,添加属性请用Vue.set),这时候setter会通知闭包中的Dep,Dep中有一些订阅了这个对象改变的Watcher观察者对象,Dep会通知Watcher对象更新视图。
如果是修改一个数组的成员,该成员是一个对象,那只需要递归对数组的成员进行双向绑定即可。但这时候出现了一个问题,如果我们进行pop、push等操作的时候,push进去的对象根本没有进行过双向绑定,更别说pop了,那么我们如何监听数组的这些变化呢? Vue.js提供的方法是重写push、pop、shift、unshift、splice、sort、reverse这七个数组方法。修改数组原型方法的代码可以参考observer/array.js以及observer/index.js。
export class Observer {
  value: any;
  dep: Dep;
  vmCount: number; // number of vms that has this object as root $data

  constructor (value: any) {
    //.......

    if (Array.isArray(value)) {
      /*
          如果是数组,将修改后可以截获响应的数组方法替换掉该数组的原型中的原生方法,达到监听数组数据变化响应的效果。
          这里如果当前浏览器支持__proto__属性,则直接覆盖当前数组对象原型上的原生数组方法,如果不支持该属性,则直接覆盖数组对象的原型。
      */
      const augment = hasProto
        ? protoAugment  /*直接覆盖原型的方法来修改目标对象*/
        : copyAugment   /*定义(覆盖)目标对象或数组的某一个方法*/
      augment(value, arrayMethods, arrayKeys)

      /*如果是数组则需要遍历数组的每一个成员进行observe*/
      this.observeArray(value)
    } else {
      /*如果是对象则直接walk进行绑定*/
      this.walk(value)
    }
  }
}

/**
 * Augment an target Object or Array by intercepting
 * the prototype chain using __proto__
 */
 /*直接覆盖原型的方法来修改目标对象或数组*/
function protoAugment (target, src: Object) {
  /* eslint-disable no-proto */
  target.__proto__ = src
  /* eslint-enable no-proto */
}

/**
 * Augment an target Object or Array by defining
 * hidden properties.
 */
/* istanbul ignore next */
/*定义(覆盖)目标对象或数组的某一个方法*/
function copyAugment (target: Object, src: Object, keys: Array<string>) {
  for (let i = 0, l = keys.length; i < l; i++) {
    const key = keys[i]
    def(target, key, src[key])
  }
}
2
3
4
5
6
7
8
9
10
11
12
13
14
15
16
17
18
19
20
21
22
23
24
25
26
27
28
29
30
31
32
33
34
35
36
37
38
39
40
41
42
43
44
45
46
47
48
49
50
/*
 * not type checking this file because flow doesn't play well with
 * dynamically accessing methods on Array prototype
 */

import { def } from '../util/index'

/*取得原生数组的原型*/
const arrayProto = Array.prototype
/*创建一个新的数组对象,修改该对象上的数组的七个方法,防止污染原生数组方法*/
export const arrayMethods = Object.create(arrayProto)

/**
 * Intercept mutating methods and emit events
 */
 /*这里重写了数组的这些方法,在保证不污染原生数组原型的情况下重写数组的这些方法,截获数组的成员发生的变化,执行原生数组操作的同时dep通知关联的所有观察者进行响应式处理*/
[
  'push',
  'pop',
  'shift',
  'unshift',
  'splice',
  'sort',
  'reverse'
]
.forEach(function (method) {
  // cache original method
  /*将数组的原生方法缓存起来,后面要调用*/
  const original = arrayProto[method]
  def(arrayMethods, method, function mutator () {
    // avoid leaking arguments:
    // http://jsperf.com/closure-with-arguments
    let i = arguments.length
    const args = new Array(i)
    while (i--) {
      args[i] = arguments[i]
    }
    /*调用原生的数组方法*/
    const result = original.apply(this, args)

    /*数组新插入的元素需要重新进行observe才能响应式*/
    const ob = this.__ob__
    let inserted
    switch (method) {
      case 'push':
        inserted = args
        break
      case 'unshift':
        inserted = args
        break
      case 'splice':
        inserted = args.slice(2)
        break
    }
    if (inserted) ob.observeArray(inserted)

    // notify change
    /*dep通知所有注册的观察者进行响应式处理*/
    ob.dep.notify()
    return result
  })
})
2
3
4
5
6
7
8
9
10
11
12
13
14
15
16
17
18
19
20
21
22
23
24
25
26
27
28
29
30
31
32
33
34
35
36
37
38
39
40
41
42
43
44
45
46
47
48
49
50
51
52
53
54
55
56
57
58
59
60
61
62
63
从数组的原型新建一个Object.create(arrayProto)对象,通过修改此原型可以保证原生数组方法不被污染。如果当前浏览器支持__proto__这个属性的话就可以直接覆盖该属性使数组对象具有了重写后的数组方法。如果浏览器没有该属性,则必须通过遍历def所有需要重写的数组方法,这种方法效率较低,所以优先使用第一种。
在保证不污染不覆盖数组原生方法添加监听,主要做了两个操作,第一是通知所有注册的观察者进行响应式处理,第二是如果是添加成员的操作,需要对新成员进行observe。
但是修改了数组的原生方法以后我们还是没法像原生数组一样直接通过数组的下标或者设置length来修改数组,可以通过Vue.set以及splice方法。
对于更具体的讲解数据双向绑定以及Dep、Watcher的实现可以参考笔者的文章《从源码角度再看数据绑定》。
# template编译
在$mount过程中,如果是使用独立构建,则会在此过程中将template编译成render function。当然,你也可以采用运行时构建。具体参考运行时-编译器-vs-只包含运行时。
template是如何被编译成render function的呢?
function baseCompile (
  template: string,
  options: CompilerOptions
): CompiledResult {
  /*parse解析得到ast树*/
  const ast = parse(template.trim(), options)
  /*
    将AST树进行优化
    优化的目标:生成模板AST树,检测不需要进行DOM改变的静态子树。
    一旦检测到这些静态树,我们就能做以下这些事情:
    1.把它们变成常数,这样我们就再也不需要每次重新渲染时创建新的节点了。
    2.在patch的过程中直接跳过。
 */
  optimize(ast, options)
  /*根据ast树生成所需的code(内部包含render与staticRenderFns)*/
  const code = generate(ast, options)
  return {
    ast,
    render: code.render,
    staticRenderFns: code.staticRenderFns
  }
}
2
3
4
5
6
7
8
9
10
11
12
13
14
15
16
17
18
19
20
21
22
baseCompile首先会将模板template进行parse得到一个AST语法树,再通过optimize做一些优化,最后通过generate得到render以及staticRenderFns。
# parse
parse的源码可以参见https://github.com/answershuto/learnVue/blob/master/vue-src/compiler/parser/index.js#L53。
parse会用正则等方式解析template模板中的指令、class、style等数据,形成AST语法树。
# optimize
optimize的主要作用是标记static静态节点,这是Vue在编译过程中的一处优化,后面当update更新界面时,会有一个patch的过程,diff算法会直接跳过静态节点,从而减少了比较的过程,优化了patch的性能。
# generate
generate是将AST语法树转化成render funtion字符串的过程,得到结果是render的字符串以及staticRenderFns字符串。
具体的template编译实现请参考《聊聊Vue.js的template编译》。
# Watcher到视图
Watcher对象会通过调用updateComponent方法来达到更新视图的目的。这里提一下,其实Watcher并不是实时更新视图的,Vue.js默认会将Watcher对象存在一个队列中,在下一个tick时更新异步更新视图,完成了性能优化。关于nextTick感兴趣的小伙伴可以参考《Vue.js异步更新DOM策略及nextTick》。
updateComponent = () => {
    vm._update(vm._render(), hydrating)
}
2
3
updateComponent就执行一句话,_render函数会返回一个新的Vnode节点,传入_update中与旧的VNode对象进行对比,经过一个patch的过程得到两个VNode节点的差异,最后将这些差异渲染到真实环境形成视图。
# 最后
至此,我们已经从template到真实DOM的整个过程梳理完了。现在再去看这张图,是不是更清晰了呢?
# 十、Vuex源码解析
# Vuex
我们在使用 Vue.js 开发复杂的应用时,经常会遇到多个组件共享同一个状态,亦或是多个组件会去更新同一个状态,在应用代码量较少的时候,我们可以组件间通信去维护修改数据,或者是通过事件总线来进行数据的传递以及修改。但是当应用逐渐庞大以后,代码就会变得难以维护,从父组件开始通过 prop 传递多层嵌套的数据由于层级过深而显得异常脆弱,而事件总线也会因为组件的增多、代码量的增大而显得交互错综复杂,难以捋清其中的传递关系。
那么为什么我们不能将数据层与组件层抽离开来呢?把数据层放到全局形成一个单一的 Store,组件层变得更薄,专门用来进行数据的展示及操作。所有数据的变更都需要经过全局的 Store 来进行,形成一个单向数据流,使数据变化变得“可预测”。
Vuex 是一个专门为 Vue.js 框架设计的、用于对 Vue.js 应用程序进行状态管理的库,它借鉴了 Flux、redux 的基本思想,将共享的数据抽离到全局,以一个单例存放,同时利用 Vue.js 的响应式机制来进行高效的状态管理与更新。正是因为 Vuex 使用了 Vue.js 内部的“响应式机制”,所以 Vuex 是一个专门为 Vue.js 设计并与之高度契合的框架(优点是更加简洁高效,缺点是只能跟 Vue.js 搭配使用)。具体使用方法及 API 可以参考Vuex 的官网。
先来看一下这张 Vuex 的数据流程图,熟悉 Vuex 使用的同学应该已经有所了解。
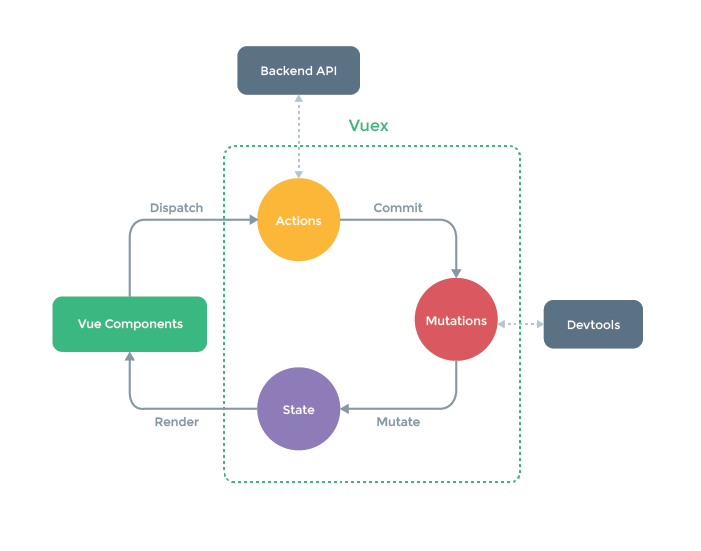
Vuex 实现了一个单向数据流,在全局拥有一个 State 存放数据,所有修改 State 的操作必须通过 Mutation 进行,Mutation 的同时提供了订阅者模式供外部插件调用获取 State 数据的更新。所有异步接口需要走 Action,常见于调用后端接口异步获取更新数据,而 Action 也是无法直接修改 State 的,还是需要通过 Mutation 来修改 State 的数据。最后,根据 State 的变化,渲染到视图上。Vuex 运行依赖 Vue 内部数据双向绑定机制,需要 new 一个 Vue 对象来实现“响应式化”,所以 Vuex 是一个专门为 Vue.js 设计的状态管理库。
# 安装
使用过 Vuex 的朋友一定知道,Vuex 的安装十分简单,只需要提供一个 store,然后执行下面两句代码即完成的 Vuex 的引入。
Vue.use(Vuex);

/*将store放入Vue创建时的option中*/
new Vue({
  el: "#app",
  store
});
2
3
4
5
6
7
那么问题来了,Vuex 是怎样把 store 注入到 Vue 实例中去的呢?
Vue.js 提供了Vue.use方法用来给 Vue.js 安装插件,内部通过调用插件的 install 方法(当插件是一个对象的时候)来进行插件的安装。
我们来看一下 Vuex 的 install 实现。
/*暴露给外部的插件install方法,供Vue.use调用安装插件*/
export function install(_Vue) {
  if (Vue) {
    /*避免重复安装(Vue.use内部也会检测一次是否重复安装同一个插件)*/
    if (process.env.NODE_ENV !== "production") {
      console.error(
        "[vuex] already installed. Vue.use(Vuex) should be called only once."
      );
    }
    return;
  }
  /*保存Vue,同时用于检测是否重复安装*/
  Vue = _Vue;
  /*将vuexInit混淆进Vue的beforeCreate(Vue2.0)或_init方法(Vue1.0)*/
  applyMixin(Vue);
}
2
3
4
5
6
7
8
9
10
11
12
13
14
15
16
这段 install 代码做了两件事情,一件是防止 Vuex 被重复安装,另一件是执行 applyMixin,目的是执行 vuexInit 方法初始化 Vuex。Vuex 针对 Vue1.0 与 2.0 分别进行了不同的处理,如果是 Vue1.0,Vuex 会将 vuexInit 方法放入 Vue 的_init 方法中,而对于 Vue2.0,则会将 vuexinit 混淆进 Vue 的 beforeCreate 钩子中。来看一下 vuexInit 的代码。
/*Vuex的init钩子,会存入每一个Vue实例等钩子列表*/
function vuexInit() {
  const options = this.$options;
  // store injection
  if (options.store) {
    /*存在store其实代表的就是Root节点,直接执行store(function时)或者使用store(非function)*/
    this.$store =
      typeof options.store === "function" ? options.store() : options.store;
  } else if (options.parent && options.parent.$store) {
    /*子组件直接从父组件中获取$store,这样就保证了所有组件都公用了全局的同一份store*/
    this.$store = options.parent.$store;
  }
}
2
3
4
5
6
7
8
9
10
11
12
13
vuexInit 会尝试从 options 中获取 store,如果当前组件是根组件(Root 节点),则 options 中会存在 store,直接获取赋值给$store即可。如果当前组件非根组件,则通过options中的parent获取父组件的$store 引用。这样一来,所有的组件都获取到了同一份内存地址的 Store 实例,于是我们可以在每一个组件中通过 this.$store 愉快地访问全局的 Store 实例了。
那么,什么是 Store 实例?
# Store
我们传入到根组件的store,就是Store实例,用Vuex提供的Store方法构造。
export default new Vuex.Store({
    strict: true,
    modules: {
        moduleA,
        moduleB
    }
});
2
3
4
5
6
7
我们来看一下Store的实现。首先是构造函数。
constructor (options = {}) {
    // Auto install if it is not done yet and `window` has `Vue`.
    // To allow users to avoid auto-installation in some cases,
    // this code should be placed here. See #731
    /*
      在浏览器环境下,如果插件还未安装(!Vue即判断是否未安装),则它会自动安装。
      它允许用户在某些情况下避免自动安装。
    */
    if (!Vue && typeof window !== 'undefined' && window.Vue) {
      install(window.Vue)
    }

    if (process.env.NODE_ENV !== 'production') {
      assert(Vue, `must call Vue.use(Vuex) before creating a store instance.`)
      assert(typeof Promise !== 'undefined', `vuex requires a Promise polyfill in this browser.`)
      assert(this instanceof Store, `Store must be called with the new operator.`)
    }

    const {
      /*一个数组,包含应用在 store 上的插件方法。这些插件直接接收 store 作为唯一参数,可以监听 mutation(用于外部地数据持久化、记录或调试)或者提交 mutation (用于内部数据,例如 websocket 或 某些观察者)*/
      plugins = [],
      /*使 Vuex store 进入严格模式,在严格模式下,任何 mutation 处理函数以外修改 Vuex state 都会抛出错误。*/
      strict = false
    } = options

    /*从option中取出state,如果state是function则执行,最终得到一个对象*/
    let {
      state = {}
    } = options
    if (typeof state === 'function') {
      state = state()
    }

    // store internal state
    /* 用来判断严格模式下是否是用mutation修改state的 */
    this._committing = false
    /* 存放action */
    this._actions = Object.create(null)
    /* 存放mutation */
    this._mutations = Object.create(null)
    /* 存放getter */
    this._wrappedGetters = Object.create(null)
    /* module收集器 */
    this._modules = new ModuleCollection(options)
    /* 根据namespace存放module */
    this._modulesNamespaceMap = Object.create(null)
    /* 存放订阅者 */
    this._subscribers = []
    /* 用以实现Watch的Vue实例 */
    this._watcherVM = new Vue()

    // bind commit and dispatch to self
    /*将dispatch与commit调用的this绑定为store对象本身,否则在组件内部this.dispatch时的this会指向组件的vm*/
    const store = this
    const { dispatch, commit } = this
    /* 为dispatch与commit绑定this(Store实例本身) */
    this.dispatch = function boundDispatch (type, payload) {
      return dispatch.call(store, type, payload)
    }
    this.commit = function boundCommit (type, payload, options) {
      return commit.call(store, type, payload, options)
    }

    // strict mode
    /*严格模式(使 Vuex store 进入严格模式,在严格模式下,任何 mutation 处理函数以外修改 Vuex state 都会抛出错误)*/
    this.strict = strict

    // init root module.
    // this also recursively registers all sub-modules
    // and collects all module getters inside this._wrappedGetters
    /*初始化根module,这也同时递归注册了所有子module,收集所有module的getter到_wrappedGetters中去,this._modules.root代表根module才独有保存的Module对象*/
    installModule(this, state, [], this._modules.root)

    // initialize the store vm, which is responsible for the reactivity
    // (also registers _wrappedGetters as computed properties)
    /* 通过vm重设store,新建Vue对象使用Vue内部的响应式实现注册state以及computed */
    resetStoreVM(this, state)

    // apply plugins
    /* 调用插件 */
    plugins.forEach(plugin => plugin(this))

    /* devtool插件 */
    if (Vue.config.devtools) {
      devtoolPlugin(this)
    }
  }
2
3
4
5
6
7
8
9
10
11
12
13
14
15
16
17
18
19
20
21
22
23
24
25
26
27
28
29
30
31
32
33
34
35
36
37
38
39
40
41
42
43
44
45
46
47
48
49
50
51
52
53
54
55
56
57
58
59
60
61
62
63
64
65
66
67
68
69
70
71
72
73
74
75
76
77
78
79
80
81
82
83
84
85
86
87
Store的构造类除了初始化一些内部变量以外,主要执行了installModule(初始化module)以及resetStoreVM(通过VM使store“响应式”)。
# installModule
installModule的作用主要是为module加上namespace名字空间(如果有)后,注册mutation、action以及getter,同时递归安装所有子module。
/*初始化module*/
function installModule (store, rootState, path, module, hot) {
  /* 是否是根module */
  const isRoot = !path.length
  /* 获取module的namespace */
  const namespace = store._modules.getNamespace(path)

  // register in namespace map
  /* 如果有namespace则在_modulesNamespaceMap中注册 */
  if (module.namespaced) {
    store._modulesNamespaceMap[namespace] = module
  }

  // set state
  if (!isRoot && !hot) {
    /* 获取父级的state */
    const parentState = getNestedState(rootState, path.slice(0, -1))
    /* module的name */
    const moduleName = path[path.length - 1]
    store.`_withCommit`(() => {
      /* 将子module设成响应式的 */
      Vue.set(parentState, moduleName, module.state)
    })
  }

  const local = module.context = makeLocalContext(store, namespace, path)

  /* 遍历注册mutation */
  module.forEachMutation((mutation, key) => {
    const namespacedType = namespace + key
    registerMutation(store, namespacedType, mutation, local)
  })

  /* 遍历注册action */
  module.forEachAction((action, key) => {
    const namespacedType = namespace + key
    registerAction(store, namespacedType, action, local)
  })

  /* 遍历注册getter */
  module.forEachGetter((getter, key) => {
    const namespacedType = namespace + key
    registerGetter(store, namespacedType, getter, local)
  })

  /* 递归安装mudule */
  module.forEachChild((child, key) => {
    installModule(store, rootState, path.concat(key), child, hot)
  })
}
2
3
4
5
6
7
8
9
10
11
12
13
14
15
16
17
18
19
20
21
22
23
24
25
26
27
28
29
30
31
32
33
34
35
36
37
38
39
40
41
42
43
44
45
46
47
48
49
50
# resetStoreVM
在说resetStoreVM之前,先来看一个小demo。
let globalData = {
    d: 'hello world'
};
new Vue({
    data () {
        return {
            $$state: {
                globalData
            }
        }
    }
});

/* modify */
setTimeout(() => {
    globalData.d = 'hi~';
}, 1000);

Vue.prototype.globalData = globalData;

/* 任意模板中 */
<div>{{globalData.d}}</div>
2
3
4
5
6
7
8
9
10
11
12
13
14
15
16
17
18
19
20
21
22
上述代码在全局有一个globalData,它被传入一个Vue对象的data中,之后在任意Vue模板中对该变量进行展示,因为此时globalData已经在Vue的prototype上了所以直接通过this.prototype访问,也就是在模板中的prototype.d。此时,setTimeout在1s之后将globalData.d进行修改,我们发现模板中的globalData.d发生了变化。其实上述部分就是Vuex依赖Vue核心实现数据的“响应式化”。
不熟悉Vue.js响应式原理的同学可以通过笔者另一篇文章响应式原理了解Vue.js是如何进行数据双向绑定的。
接着来看代码。
/* 通过vm重设store,新建Vue对象使用Vue内部的响应式实现注册state以及computed */
function resetStoreVM (store, state, hot) {
  /* 存放之前的vm对象 */
  const oldVm = store._vm

  // bind store public getters
  store.getters = {}
  const wrappedGetters = store._wrappedGetters
  const computed = {}

  /* 通过Object.defineProperty为每一个getter方法设置get方法,比如获取this.$store.getters.test的时候获取的是store._vm.test,也就是Vue对象的computed属性 */
  forEachValue(wrappedGetters, (fn, key) => {
    // use computed to leverage its lazy-caching mechanism
    computed[key] = () => fn(store)
    Object.defineProperty(store.getters, key, {
      get: () => store._vm[key],
      enumerable: true // for local getters
    })
  })

  // use a Vue instance to store the state tree
  // suppress warnings just in case the user has added
  // some funky global mixins
  const silent = Vue.config.silent
  /* Vue.config.silent暂时设置为true的目的是在new一个Vue实例的过程中不会报出一切警告 */
  Vue.config.silent = true
  /*  这里new了一个Vue对象,运用Vue内部的响应式实现注册state以及computed*/
  store._vm = new Vue({
    data: {
      $$state: state
    },
    computed
  })
  Vue.config.silent = silent

  // enable strict mode for new vm
  /* 使能严格模式,保证修改store只能通过mutation */
  if (store.strict) {
    enableStrictMode(store)
  }

  if (oldVm) {
    /* 解除旧vm的state的引用,以及销毁旧的Vue对象 */
    if (hot) {
      // dispatch changes in all subscribed watchers
      // to force getter re-evaluation for hot reloading.
      store._withCommit(() => {
        oldVm._data.$$state = null
      })
    }
    Vue.nextTick(() => oldVm.$destroy())
  }
}
2
3
4
5
6
7
8
9
10
11
12
13
14
15
16
17
18
19
20
21
22
23
24
25
26
27
28
29
30
31
32
33
34
35
36
37
38
39
40
41
42
43
44
45
46
47
48
49
50
51
52
53
resetStoreVM首先会遍历wrappedGetters,使用Object.defineProperty方法为每一个getter绑定上get方法,这样我们就可以在组件里访问this.$store.getters.test就等同于访问store._vm.test。
forEachValue(wrappedGetters, (fn, key) => {
  // use computed to leverage its lazy-caching mechanism
  computed[key] = () => fn(store)
  Object.defineProperty(store.getters, key, {
    get: () => store._vm[key],
    enumerable: true // for local getters
  })
})
2
3
4
5
6
7
8
之后Vuex采用了new一个Vue对象来实现数据的“响应式化”,运用Vue.js内部提供的数据双向绑定功能来实现store的数据与视图的同步更新。
store._vm = new Vue({
  data: {
    $$state: state
  },
  computed
})
2
3
4
5
6
这时候我们访问store._vm.test也就访问了Vue实例中的属性。
这两步执行完以后,我们就可以通过this.$store.getter.test访问vm中的test属性了。
# 严格模式
Vuex的Store构造类的option有一个strict的参数,可以控制Vuex执行严格模式,严格模式下,所有修改state的操作必须通过mutation实现,否则会抛出错误。
/* 使能严格模式 */
function enableStrictMode (store) {
  store._vm.$watch(function () { return this._data.$$state }, () => {
    if (process.env.NODE_ENV !== 'production') {
      /* 检测store中的_committing的值,如果是false代表不是通过mutation的方法修改的 */
      assert(store._committing, `Do not mutate vuex store state outside mutation handlers.`)
    }
  }, { deep: true, sync: true })
}
2
3
4
5
6
7
8
9
首先,在严格模式下,Vuex会利用vm的$watch方法来观察$$state,也就是Store的state,在它被修改的时候进入回调。我们发现,回调中只有一句话,用assert断言来检测store._committing,当store._committing为false的时候会触发断言,抛出异常。
我们发现,Store的commit方法中,执行mutation的语句是这样的。
this._withCommit(() => {
  entry.forEach(function commitIterator (handler) {
    handler(payload)
  })
})
2
3
4
5
再来看看_withCommit的实现。
_withCommit (fn) {
  /* 调用withCommit修改state的值时会将store的committing值置为true,内部会有断言检查该值,在严格模式下只允许使用mutation来修改store中的值,而不允许直接修改store的数值 */
  const committing = this._committing
  this._committing = true
  fn()
  this._committing = committing
}
2
3
4
5
6
7
我们发现,通过commit(mutation)修改state数据的时候,会在调用mutation方法之前将committing置为true,接下来再通过mutation函数修改state中的数据,这时候触发$watch中的回调断言committing是不会抛出异常的(此时committing为true)。而当我们直接修改state的数据时,触发$watch的回调执行断言,这时committing为false,则会抛出异常。这就是Vuex的严格模式的实现。
接下来我们来看看Store提供的一些API。
# commit(mutation)
/* 调用mutation的commit方法 */
commit (_type, _payload, _options) {
  // check object-style commit
  /* 校验参数 */
  const {
    type,
    payload,
    options
  } = unifyObjectStyle(_type, _payload, _options)

  const mutation = { type, payload }
  /* 取出type对应的mutation的方法 */
  const entry = this._mutations[type]
  if (!entry) {
    if (process.env.NODE_ENV !== 'production') {
      console.error(`[vuex] unknown mutation type: ${type}`)
    }
    return
  }
  /* 执行mutation中的所有方法 */
  this._withCommit(() => {
    entry.forEach(function commitIterator (handler) {
      handler(payload)
    })
  })
  /* 通知所有订阅者 */
  this._subscribers.forEach(sub => sub(mutation, this.state))

  if (
    process.env.NODE_ENV !== 'production' &&
    options && options.silent
  ) {
    console.warn(
      `[vuex] mutation type: ${type}. Silent option has been removed. ` +
      'Use the filter functionality in the vue-devtools'
    )
  }
}
2
3
4
5
6
7
8
9
10
11
12
13
14
15
16
17
18
19
20
21
22
23
24
25
26
27
28
29
30
31
32
33
34
35
36
37
38
commit方法会根据type找到并调用_mutations中的所有type对应的mutation方法,所以当没有namespace的时候,commit方法会触发所有module中的mutation方法。再执行完所有的mutation之后会执行_subscribers中的所有订阅者。我们来看一下_subscribers是什么。
Store给外部提供了一个subscribe方法,用以注册一个订阅函数,会push到Store实例的_subscribers中,同时返回一个从_subscribers中注销该订阅者的方法。
/* 注册一个订阅函数,返回取消订阅的函数 */
subscribe (fn) {
  const subs = this._subscribers
  if (subs.indexOf(fn) < 0) {
    subs.push(fn)
  }
  return () => {
    const i = subs.indexOf(fn)
    if (i > -1) {
      subs.splice(i, 1)
    }
  }
}
2
3
4
5
6
7
8
9
10
11
12
13
在commit结束以后则会调用这些_subscribers中的订阅者,这个订阅者模式提供给外部一个监视state变化的可能。state通过mutation改变时,可以有效补获这些变化。
# dispatch(action)
来看一下dispatch的实现。
/* 调用action的dispatch方法 */
dispatch (_type, _payload) {
  // check object-style dispatch
  const {
    type,
    payload
  } = unifyObjectStyle(_type, _payload)

  /* actions中取出type对应的action */
  const entry = this._actions[type]
  if (!entry) {
    if (process.env.NODE_ENV !== 'production') {
      console.error(`[vuex] unknown action type: ${type}`)
    }
    return
  }

  /* 是数组则包装Promise形成一个新的Promise,只有一个则直接返回第0个 */
  return entry.length > 1
    ? Promise.all(entry.map(handler => handler(payload)))
    : entry[0](payload)
}
2
3
4
5
6
7
8
9
10
11
12
13
14
15
16
17
18
19
20
21
22
以及registerAction时候做的事情。
/* 遍历注册action */
function registerAction (store, type, handler, local) {
  /* 取出type对应的action */
  const entry = store._actions[type] || (store._actions[type] = [])
  entry.push(function wrappedActionHandler (payload, cb) {
    let res = handler.call(store, {
      dispatch: local.dispatch,
      commit: local.commit,
      getters: local.getters,
      state: local.state,
      rootGetters: store.getters,
      rootState: store.state
    }, payload, cb)
    /* 判断是否是Promise */
    if (!isPromise(res)) {
      /* 不是Promise对象的时候转化称Promise对象 */
      res = Promise.resolve(res)
    }
    if (store._devtoolHook) {
      /* 存在devtool插件的时候触发vuex的error给devtool */
      return res.catch(err => {
        store._devtoolHook.emit('vuex:error', err)
        throw err
      })
    } else {
      return res
    }
  })
}
2
3
4
5
6
7
8
9
10
11
12
13
14
15
16
17
18
19
20
21
22
23
24
25
26
27
28
29
因为registerAction的时候将push进_actions的action进行了一层封装(wrappedActionHandler),所以我们在进行dispatch的第一个参数中获取state、commit等方法。之后,执行结果res会被进行判断是否是Promise,不是则会进行一层封装,将其转化成Promise对象。dispatch时则从_actions中取出,只有一个的时候直接返回,否则用Promise.all处理再返回。
# watch
/* 观察一个getter方法 */
watch (getter, cb, options) {
  if (process.env.NODE_ENV !== 'production') {
    assert(typeof getter === 'function', `store.watch only accepts a function.`)
  }
  return this._watcherVM.$watch(() => getter(this.state, this.getters), cb, options)
}
2
3
4
5
6
7
熟悉Vue的朋友应该很熟悉watch这个方法。这里采用了比较巧妙的设计,_watcherVM是一个Vue的实例,所以watch就可以直接采用了Vue内部的watch特性提供了一种观察数据getter变动的方法。
# registerModule
/* 注册一个动态module,当业务进行异步加载的时候,可以通过该接口进行注册动态module */
registerModule (path, rawModule) {
  /* 转化称Array */
  if (typeof path === 'string') path = [path]

  if (process.env.NODE_ENV !== 'production') {
    assert(Array.isArray(path), `module path must be a string or an Array.`)
    assert(path.length > 0, 'cannot register the root module by using registerModule.')
  }

  /*注册*/
  this._modules.register(path, rawModule)
  /*初始化module*/
  installModule(this, this.state, path, this._modules.get(path))
  // reset store to update getters...
  /* 通过vm重设store,新建Vue对象使用Vue内部的响应式实现注册state以及computed */
  resetStoreVM(this, this.state)
}
2
3
4
5
6
7
8
9
10
11
12
13
14
15
16
17
18
registerModule用以注册一个动态模块,也就是在store创建以后再注册模块的时候用该接口。内部实现实际上也只有installModule与resetStoreVM两个步骤,前面已经讲过,这里不再累述。
# unregisterModule
 /* 注销一个动态module */
unregisterModule (path) {
  /* 转化称Array */
  if (typeof path === 'string') path = [path]

  if (process.env.NODE_ENV !== 'production') {
    assert(Array.isArray(path), `module path must be a string or an Array.`)
  }

  /*注销*/
  this._modules.unregister(path)
  this._withCommit(() => {
    /* 获取父级的state */
    const parentState = getNestedState(this.state, path.slice(0, -1))
    /* 从父级中删除 */
    Vue.delete(parentState, path[path.length - 1])
  })
  /* 重制store */
  resetStore(this)
}
2
3
4
5
6
7
8
9
10
11
12
13
14
15
16
17
18
19
20
同样,与registerModule对应的方法unregisterModule,动态注销模块。实现方法是先从state中删除模块,然后用resetStore来重制store。
# resetStore
/* 重制store */
function resetStore (store, hot) {
  store._actions = Object.create(null)
  store._mutations = Object.create(null)
  store._wrappedGetters = Object.create(null)
  store._modulesNamespaceMap = Object.create(null)
  const state = store.state
  // init all modules
  installModule(store, state, [], store._modules.root, true)
  // reset vm
  resetStoreVM(store, state, hot)
}
2
3
4
5
6
7
8
9
10
11
12
这里的resetStore其实也就是将store中的_actions等进行初始化以后,重新执行installModule与resetStoreVM来初始化module以及用Vue特性使其“响应式化”,这跟构造函数中的是一致的。
# 插件
Vue提供了一个非常好用的插件Vue.js devtools
/* 从window对象的__VUE_DEVTOOLS_GLOBAL_HOOK__中获取devtool插件 */
const devtoolHook =
  typeof window !== 'undefined' &&
  window.__VUE_DEVTOOLS_GLOBAL_HOOK__

export default function devtoolPlugin (store) {
  if (!devtoolHook) return

  /* devtoll插件实例存储在store的_devtoolHook上 */
  store._devtoolHook = devtoolHook

  /* 出发vuex的初始化事件,并将store的引用地址传给deltool插件,使插件获取store的实例 */
  devtoolHook.emit('vuex:init', store)

  /* 监听travel-to-state事件 */
  devtoolHook.on('vuex:travel-to-state', targetState => {
    /* 重制state */
    store.replaceState(targetState)
  })

  /* 订阅store的变化 */
  store.subscribe((mutation, state) => {
    devtoolHook.emit('vuex:mutation', mutation, state)
  })
}
2
3
4
5
6
7
8
9
10
11
12
13
14
15
16
17
18
19
20
21
22
23
24
25
如果已经安装了该插件,则会在windows对象上暴露一个__VUE_DEVTOOLS_GLOBAL_HOOK__。devtoolHook用在初始化的时候会触发“vuex:init”事件通知插件,然后通过on方法监听“vuex:travel-to-state”事件来重置state。最后通过Store的subscribe方法来添加一个订阅者,在触发commit方法修改mutation数据以后,该订阅者会被通知,从而触发“vuex:mutation”事件。
# 最后
Vuex是一个非常优秀的库,代码量不多且结构清晰,非常适合研究学习其内部实现。最近的一系列源码阅读也使我自己受益匪浅,写这篇文章也希望可以帮助到更多想要学习探索Vuex内部实现原理的同学。
# 十一、聊聊keep-alive组件的使用及其实现原理
# keep-alive
keep-alive 是 Vue.js 的一个内置组件。它能够不活动的组件实例保存在内存中,而不是直接将其销毁,它是一个抽象组件,不会被渲染到真实 DOM 中,也不会出现在父组件链中。
它提供了 include 与 exclude 两个属性,允许组件有条件地进行缓存。
具体内容可以参考官网。
# 使用
# 用法
<keep-alive>
  <component></component>
</keep-alive>
2
3
这里的 component 组件会被缓存起来。
# 举个栗子
<keep-alive>
  <coma v-if="test"></coma>
  <comb v-else></comb>
</keep-alive>
<button @click="test=handleClick">请点击</button>
2
3
4
5
export default {
  data() {
    return {
      test: true
    };
  },
  methods: {
    handleClick() {
      this.test = !this.test;
    }
  }
};
2
3
4
5
6
7
8
9
10
11
12
在点击 button 时候,coma 与 comb 两个组件会发生切换,但是这时候这两个组件的状态会被缓存起来,比如说 coma 与 comb 组件中都有一个 input 标签,那么 input 标签中的内容不会因为组件的切换而消失。
# props
keep-alive 组件提供了 include 与 exclude 两个属性来允许组件有条件地进行缓存,二者都可以用逗号分隔字符串、正则表达式或一个数组来表示。
<keep-alive include="a">
  <component></component>
</keep-alive>
2
3
将缓存 name 为 a 的组件。
<keep-alive exclude="a">
  <component></component>
</keep-alive>
2
3
name 为 a 的组件将不会被缓存。
# 生命钩子
keep-alive 提供了两个生命钩子,分别是 activated 与 deactivated。
因为 keep-alive 会将组件保存在内存中,并不会销毁以及重新创建,所以不会重新调用组件的 created 等方法,需要用 activated 与 deactivated 这两个生命钩子来得知当前组件是否处于活动状态。
# 深入 keep-alive 组件实现
说完了 keep-alive 组件的使用,我们从源码角度看一下 keep-alive 组件究竟是如何实现组件的缓存的呢?
# created 与 destroyed 钩子
created 钩子会创建一个 cache 对象,用来作为缓存容器,保存 vnode 节点。
created () {
    /* 缓存对象 */
    this.cache = Object.create(null)
},
2
3
4
destroyed 钩子则在组件被销毁的时候清除 cache 缓存中的所有组件实例。
/* destroyed钩子中销毁所有cache中的组件实例 */
destroyed () {
    for (const key in this.cache) {
        pruneCacheEntry(this.cache[key])
    }
},
2
3
4
5
6
# render
接下来是 render 函数。
render () {
    /* 得到slot插槽中的第一个组件 */
    const vnode: VNode = getFirstComponentChild(this.$slots.default)

    const componentOptions: ?VNodeComponentOptions = vnode && vnode.componentOptions
    if (componentOptions) {
        // check pattern
        /* 获取组件名称,优先获取组件的name字段,否则是组件的tag */
        const name: ?string = getComponentName(componentOptions)
        /* name不在inlcude中或者在exlude中则直接返回vnode(没有取缓存) */
        if (name && (
        (this.include && !matches(this.include, name)) ||
        (this.exclude && matches(this.exclude, name))
        )) {
            return vnode
        }
        const key: ?string = vnode.key == null
        // same constructor may get registered as different local components
        // so cid alone is not enough (#3269)
        ? componentOptions.Ctor.cid + (componentOptions.tag ? `::${componentOptions.tag}` : '')
        : vnode.key
        /* 如果已经做过缓存了则直接从缓存中获取组件实例给vnode,还未缓存过则进行缓存 */
        if (this.cache[key]) {
            vnode.componentInstance = this.cache[key].componentInstance
        } else {
            this.cache[key] = vnode
        }
        /* keepAlive标记位 */
        vnode.data.keepAlive = true
    }
    return vnode
}
2
3
4
5
6
7
8
9
10
11
12
13
14
15
16
17
18
19
20
21
22
23
24
25
26
27
28
29
30
31
32
首先通过 getFirstComponentChild 获取第一个子组件,获取该组件的 name(存在组件名则直接使用组件名,否则会使用 tag)。接下来会将这个 name 通过 include 与 exclude 属性进行匹配,匹配不成功(说明不需要进行缓存)则不进行任何操作直接返回 vnode,vnode 是一个 VNode 类型的对象,不了解 VNode 的同学可以参考笔者的另一篇文章《VNode 节点》 .
/* 检测name是否匹配 */
function matches(pattern: string | RegExp, name: string): boolean {
  if (typeof pattern === "string") {
    /* 字符串情况,如a,b,c */
    return pattern.split(",").indexOf(name) > -1;
  } else if (isRegExp(pattern)) {
    /* 正则 */
    return pattern.test(name);
  }
  /* istanbul ignore next */
  return false;
}
2
3
4
5
6
7
8
9
10
11
12
检测 include 与 exclude 属性匹配的函数很简单,include 与 exclude 属性支持字符串如"a,b,c"这样组件名以逗号隔开的情况以及正则表达式。matches 通过这两种方式分别检测是否匹配当前组件。
if (this.cache[key]) {
  vnode.componentInstance = this.cache[key].componentInstance;
} else {
  this.cache[key] = vnode;
}
2
3
4
5
接下来的事情很简单,根据 key 在 this.cache 中查找,如果存在则说明之前已经缓存过了,直接将缓存的 vnode 的 componentInstance(组件实例)覆盖到目前的 vnode 上面。否则将 vnode 存储在 cache 中。
最后返回 vnode(有缓存时该 vnode 的 componentInstance 已经被替换成缓存中的了)。
# watch
用 watch 来监听 pruneCache 与 pruneCache 这两个属性的改变,在改变的时候修改 cache 缓存中的缓存数据。
watch: {
    /* 监视include以及exclude,在被修改的时候对cache进行修正 */
    include (val: string | RegExp) {
        pruneCache(this.cache, this._vnode, name => matches(val, name))
    },
    exclude (val: string | RegExp) {
        pruneCache(this.cache, this._vnode, name => !matches(val, name))
    }
},
2
3
4
5
6
7
8
9
来看一下 pruneCache 的实现。
/* 修正cache */
function pruneCache(cache: VNodeCache, current: VNode, filter: Function) {
  for (const key in cache) {
    /* 取出cache中的vnode */
    const cachedNode: ?VNode = cache[key];
    if (cachedNode) {
      const name: ?string = getComponentName(cachedNode.componentOptions);
      /* name不符合filter条件的,同时不是目前渲染的vnode时,销毁vnode对应的组件实例(Vue实例),并从cache中移除 */
      if (name && !filter(name)) {
        if (cachedNode !== current) {
          pruneCacheEntry(cachedNode);
        }
        cache[key] = null;
      }
    }
  }
}

/* 销毁vnode对应的组件实例(Vue实例) */
function pruneCacheEntry(vnode: ?VNode) {
  if (vnode) {
    vnode.componentInstance.$destroy();
  }
}
2
3
4
5
6
7
8
9
10
11
12
13
14
15
16
17
18
19
20
21
22
23
24
遍历 cache 中的所有项,如果不符合 filter 指定的规则的话,则会执行 pruneCacheEntry。pruneCacheEntry 则会调用组件实例的$destroy 方法来将组件销毁。
# 最后
Vue.js 内部将 DOM 节点抽象成了一个个的VNode 节点,keep-alive 组件的缓存也是基于 VNode 节点的而不是直接存储 DOM 结构。它将满足条件(pruneCache 与 pruneCache)的组件在 cache 对象中缓存起来,在需要重新渲染的时候再将 vnode 节点从 cache 对象中取出并渲染。